

Sending Domains and DNS Verification
Linking a domain is the step people dread with self-run email, so Backbuild Mail turns it into a guided wizard that shows you exactly what to do, checks each record for you, and confirms each step with a checkmark. This guide teaches you to link a domain, prove you own it, provision the records that route your mail, and understand why proper authentication is what reaches the inbox. After this page you will have a verified domain ready to receive at your own brand, and you will know the one extra step that lets it send.
Link Your Domain
After this section you will have added your domain and chosen how mail arrives. You start by entering a domain you own. Backbuild Mail then guides you through the rest.
- How inbound mail arrives. Backbuild receives inbound mail for your domain directly, and the wizard points your domain's mail routing at it. A domain on Cloudflare DNS can instead route inbound mail through Cloudflare; that option is chosen when you link the domain through the REST API.
- Domains are globally unique. A domain can be claimed by exactly one organization, so mail can never route to the wrong tenant. If another organization has already proven it owns the domain, your ownership check is refused.
Prove You Own the Domain
After this section you will have proven control of your domain. Before Backbuild Mail will send or receive for a domain, you prove you own it.
- Publish a verification record. The wizard gives you a secret TXT record to add at your DNS host. When you click Verify, Backbuild looks it up and decides whether it matches. You never assert the verdict yourself; the server confirms it.
- Skip the manual step on a connected Cloudflare account. If your Cloudflare account is connected to Backbuild, ownership can be proven automatically from the connected account, so the manual TXT step is skipped entirely.
- No mailboxes before the proof. A mailbox, including a virtual worker's inbox, can be created only on a domain whose ownership has been proven. Until the proof passes, the domain is linked but nothing is set up on it and no address can be created on it.
Add Your DNS Records
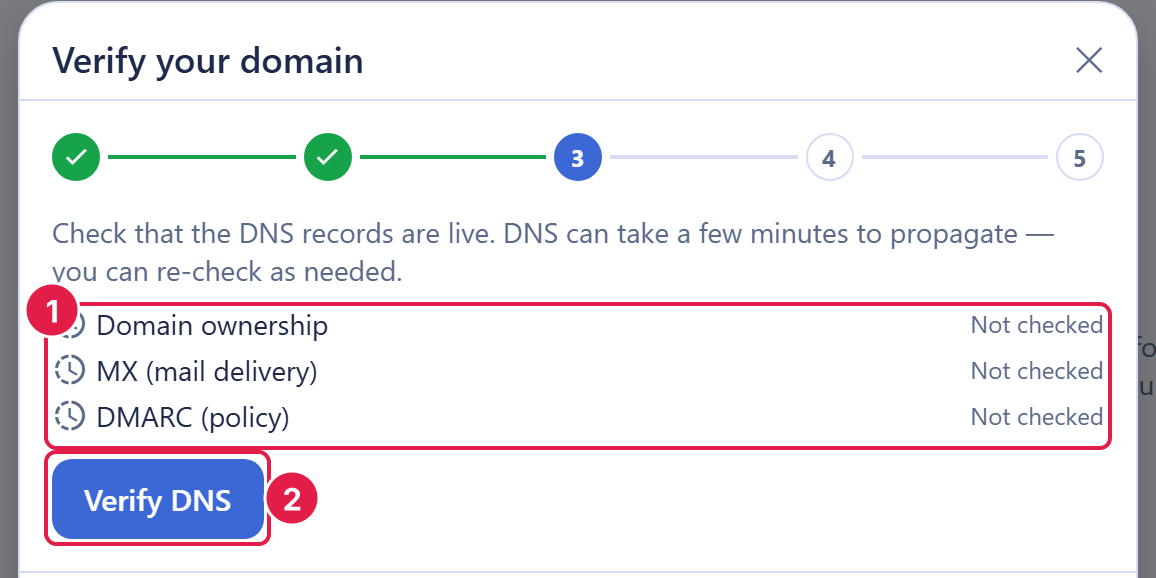
After this section you will have the records that make mail deliverable, published and verified. The wizard's Add your DNS records step lists five ways to publish them. It looks up where your domain's DNS is hosted and marks that option Detected, but every option is always available.
| Option | How it works |
|---|---|
| Cloudflare (automatic) | Connect your own Cloudflare account. A new tab opens for you to approve access; the wizard updates by itself, shows "Connected to Cloudflare as" your account, and starts setting up the domain. If DNS servers have not picked up the new records yet, setup continues when you come back to its tab or choose Check now. Finding the domain in the account you connected also proves you own it. |
| GoDaddy (automatic) | Paste a GoDaddy personal access token with DNS update access (or a classic production API key and secret). The wizard previews every change, asks you to confirm any change that replaces a record already there, then applies them and checks each one. The token is used for that setup only and never stored; you can revoke it at GoDaddy afterwards. GoDaddy gives API access to accounts with at least one domain. |
| Amazon Route 53 (automatic) | Paste the access key of an IAM user limited to the policy the wizard shows (four Route 53 permissions). The same preview, confirmation and check follow. The key is used for that setup only and never stored; delete it in IAM afterwards. |
| Namecheap (guided) | Namecheap only accepts API requests from fixed addresses that you allowlist, so the records are added in Namecheap's Advanced DNS screen by hand. The wizard shows the steps and checks each record as you add it. |
| Add the records myself (any provider) | Every record with its exact host, value, priority and time-to-live, a copy button for the host and the value, and a status for each record, with links to the record help of common DNS providers. |
- Inbound routing (MX): the record that routes mail addressed to your domain into your mailboxes.
- Ownership verification (TXT): the record that proves you control the domain.
- DMARC policy (TXT): the record that tells receiving servers how to treat mail that fails authentication. If your domain already has one, it is kept.
- A live status for every record: each record shows Not checked yet, Found, Missing, Wrong value (with the value found), or Could not check. Add every record at your DNS host and save it, then choose Check records; from then on the wizard checks again each time you come back to its tab, and Check again works at any time. The wizard does not look the records up before you ask, because a check made before a record exists can make DNS servers remember it as missing for a while (often up to 30 minutes). As soon as the ownership record is found the wizard proves ownership, and once the mail record is found it verifies it, so the domain moves forward without you leaving the step. DNS changes usually appear within minutes but can take up to 48 hours.
- Outbound signing comes from Resend: your outbound mail sends through your organization's Resend account, so the records that let receiving servers confirm your mail is really from you (SPF and DKIM) come from Resend. Add the domain in your Resend account; once your linked Resend key can read domains, the wizard lists those records with the others and the GoDaddy and Route 53 options write them for you. Otherwise publish the records Resend gives you. See Outbound Routing and Allowances.
- Read-back, not assumption: every status comes from what is actually published in public DNS, so Found means the record is really in place.
Leaving the wizard does not lose your place. Reopen it, or return from Cloudflare's approval tab, and it continues at the step your domain has reached, with the option you chose.
You do not need to understand each record to get a working mailbox at your domain. When every step shows a checkmark, the domain is ready to receive; it sends once it is verified in your Resend account and linked to your Resend key.
How do I get me@my-domain email, and do I need to be technical? Link the domain and pick how to add its records: on Cloudflare, GoDaddy or Amazon Route 53 the wizard publishes them for you; anywhere else it shows each record with a copy button and tells you when each one is live. To send, verify the domain in your Resend account and link your Resend key, as described in Outbound Routing and Allowances. Then create a mailbox as described in Mailboxes, Inbox, and Reading.
Why Authentication Reaches the Inbox
After this section you will understand why some mail lands in the inbox and some lands in spam. Getting to the inbox is mostly about two things: proving your mail is really from you, and building a sending reputation.
- Authentication proves it is you. Fully authenticated mail from a domain you control reaches the inbox at far higher rates than unauthenticated mail. Verify the domain in your Resend account so its signature matches your domain, and keep the DMARC record the wizard sets up.
- Reputation has to warm up. A brand-new domain has no sending history, and receivers are cautious until you have sent steadily over time. Sudden volume spikes look suspicious. Authentication is necessary but not sufficient: expect reputation to build as you send consistently.
Why do my emails go to spam even though I set it up? Authentication (your domain verified in Resend, plus the DMARC record the wizard sets up) is required but not the whole story. A new domain has no reputation yet and must earn it by sending steadily; large sudden spikes look like abuse. Once authentication passes, the usual remaining factor is reputation building over time.
Is email at my own domain here as reliable as a big provider? Deliverability comes from correct authentication plus reputation, both of which apply the same way everywhere. Outbound mail sends through your organization's own Resend account, signed for the domain you verify there, so your sending reputation stays with a provider you choose. See Outbound Routing and Allowances.
Manage and Remove Domains
After this section you will be able to review and unlink domains. You can list your linked domains and open any one to see its verification status. When you unenroll a domain, Backbuild Mail tears down its mailboxes, routes, the domain claim, and stored objects together, so the domain is fully released and can be claimed again later if you need to.
Migrate Without Losing Mail
After this section you will know how to switch to Backbuild Mail without a gap in delivery. The moment your domain's mail routing records point at Backbuild, new mail arrives there, so plan that moment rather than letting it happen by surprise.
- Lower your MX time-to-live early. A few days before you switch, reduce the time-to-live on your current mail routing records so the change propagates quickly when you make it.
- Choose when the switch happens. With the Cloudflare, GoDaddy or Amazon Route 53 option, the wizard replaces your mail routing records with Backbuild's when you apply (GoDaddy and Route 53 show the records being replaced and ask you to confirm first), so mail starts arriving at Backbuild while you are still in the wizard. To decide the moment yourself, choose Add the records myself and publish them when you are ready.
- Create every address you use. Mail to an address at your domain that has no mailbox is returned to the sender as undeliverable. When you publish the records yourself, prove ownership and create every mailbox before you add the mail routing records; on the automatic path, create them as soon as the wizard reaches its mailbox step.
- Test right after the switch. Send a message from an outside address to each mailbox and confirm it arrives.
Keep the old provider's mailboxes readable for a while: during propagation some senders still deliver to the old records, so a few messages can land there after you switch.
Related Guides
- Mailboxes, Inbox, and Reading: create mailboxes once your domain is verified.
- Outbound Routing and Allowances: send through your own Resend account, by category.
- API and AI Agents: link and verify domains programmatically.