

Hiring and Configuring a Worker
Hiring a worker is the same act as onboarding a teammate: you give it an identity, decide what it may touch, tell it its job, and set its hours. You do it on one form, Hire a worker, opened from the roster. This guide walks every section, persona, runtime, AI settings, schedule, and access, so a worker starts with exactly the identity, reach, and working hours you intend, and it says which choices can only be made here. After this page you will be able to hire a worker, place it under a manager, give it a mailbox, and set its shift and holidays.
Hiring and configuring workers is a permissioned action, governed by your organization's roles and permissions. A worker never gains a permission beyond what the three worker roles carry, whoever configures it; see Security and Governance.
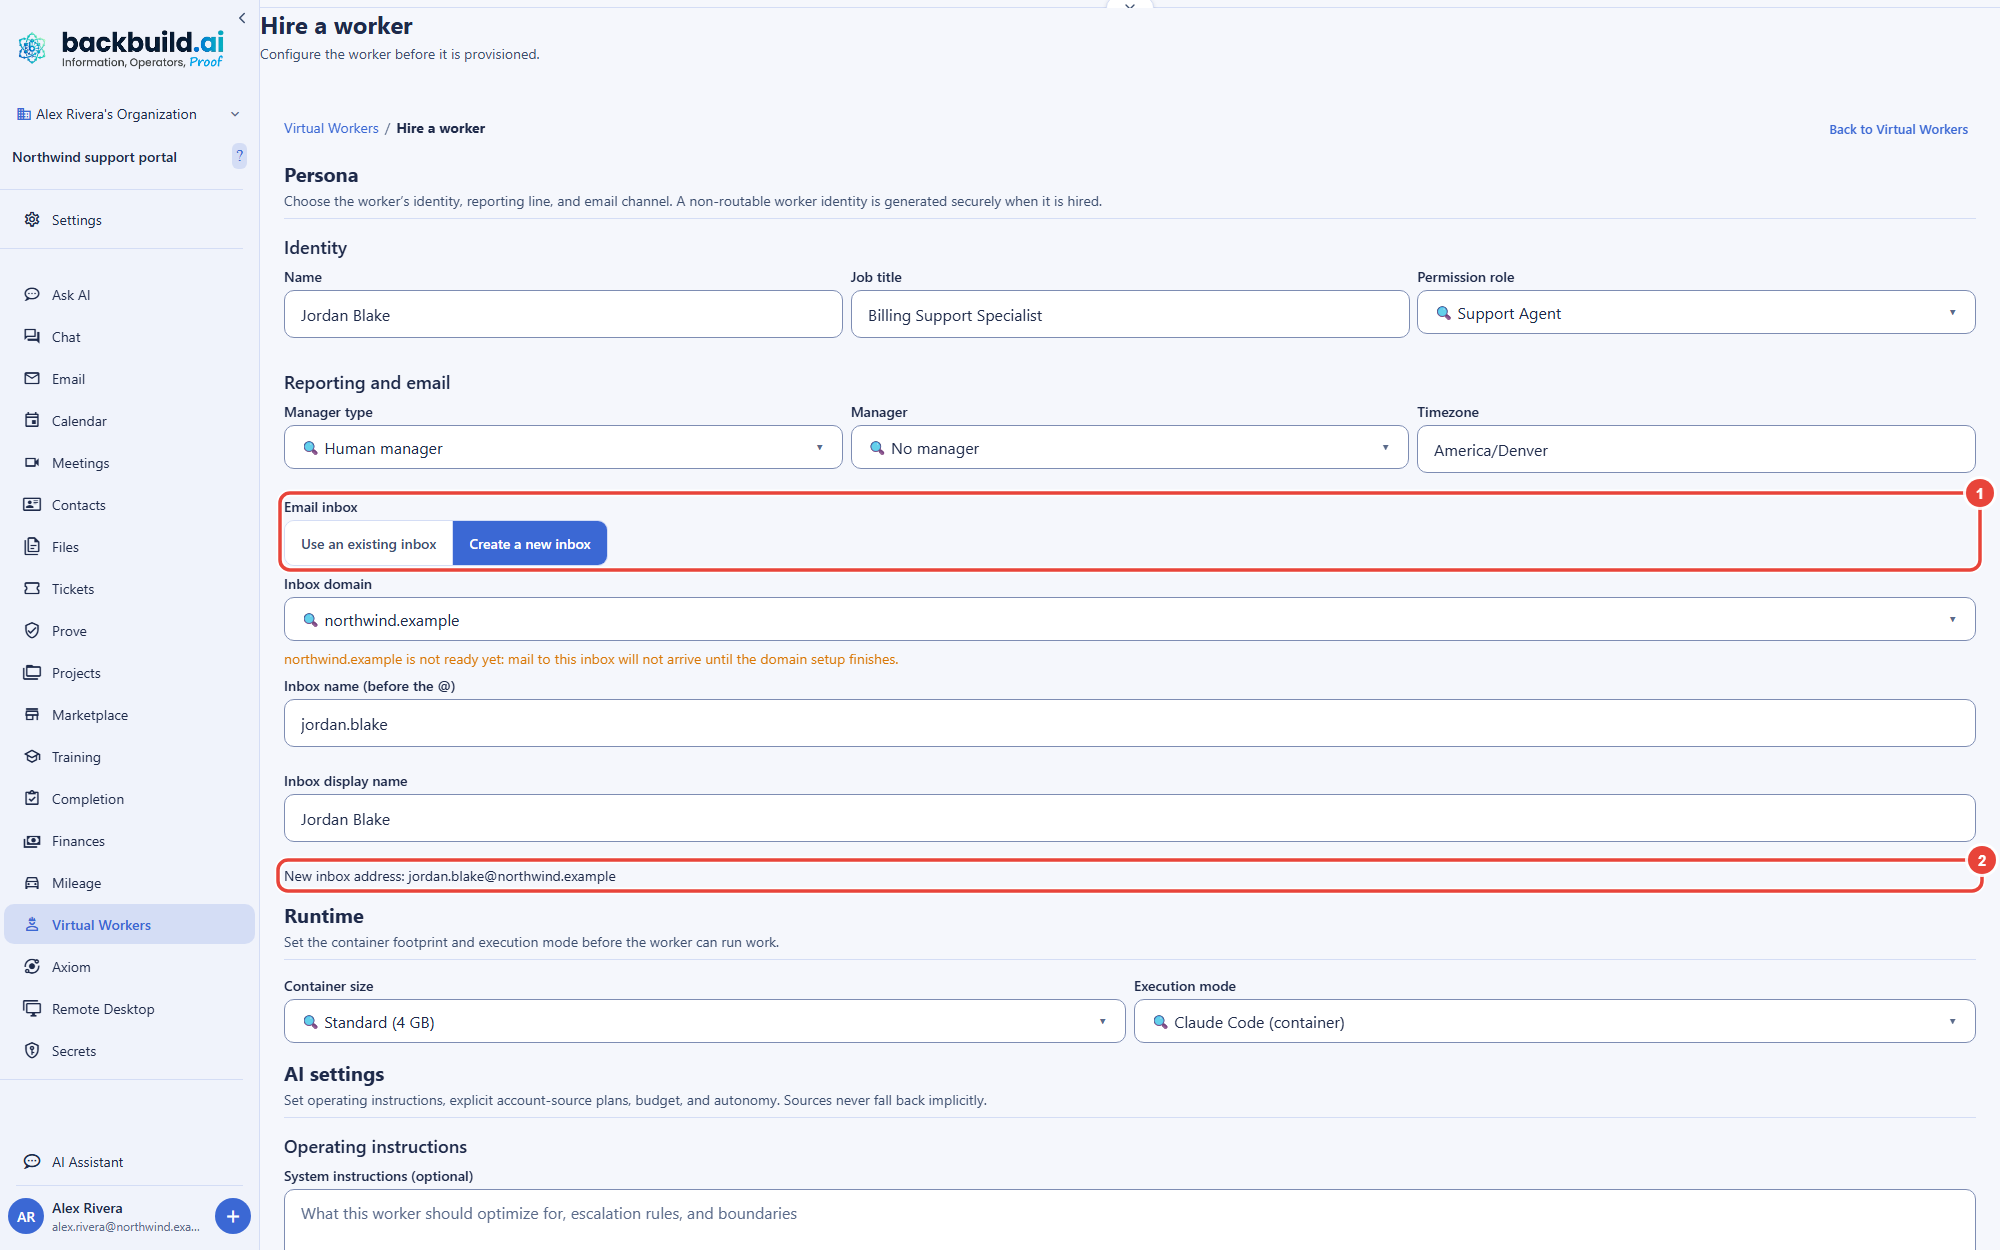
The Identity: Name, Job, and Role
After this section you will be able to give a worker an identity and decide what it is allowed to touch. Under Persona you set who the worker is:
- Name. Required. This is how the worker appears on the roster, in transcripts, and in the audit trail. Give it a real, person-like name so its work reads clearly in your history.
- Job title. A short description of what it does, for example Customer Support Agent or Build Engineer.
- Permission role. One of three roles that decides the worker's reach: Support Agent for help-desk and reply work, Developer for project and code work in a container, and Inbox Manager for triaging mail. Choose the smallest one that covers its job; a group or department it is later added to can widen its reach only within what the three worker roles carry.
A worker's underlying identity is created the moment you hire it. It is a non-login identity: it cannot sign in and holds no password of its own, so there is no sign-in to phish. That is what lets the worker own its settings, its mailbox, and its linked accounts as a first-class member of your organization without a sign-in an attacker could use. The three roles are deliberately narrow: a worker can never hold organization administration, billing, or identity-and-access management. That boundary is covered in Security and Governance.
Reporting and Email
After this section you will be able to place a worker under a manager and give it an address to work from. Still under Persona:
- Manager. Choose whether the worker reports to a person or to another worker, then pick that manager, or leave No manager. The manager is accountable for the worker's output, and a human manager decides its approvals; a worker with no human manager has its approvals decided by an organization administrator. Name a manager so every worker has a clear line of oversight.
- Timezone. The zone the worker's shift is read in. Leave it blank to use your organization's default, or set it to cover a particular region's hours.
- Email inbox. Give the worker a Backbuild Mail inbox so it works from a real address of its own. Choose Use an existing inbox to assign one you own, or Create a new inbox to create one on a verified domain: the name before the @ is prefilled from the worker's name and a preview shows the full address. The inbox is created and assigned when you hire the worker; if that fails, the worker is still hired and the message says what to fix. To hire now and add an inbox later from Configure, leave Use an existing inbox set to No inbox yet.
A worker's inbox belongs to the worker, and whoever owns the worker, the person who hires it, holds owner rights on the inbox. That is why you can assign only an inbox you own, and why a sign-in address, such as your own account email, can never be given to a worker. The full rule, and the worker's Email and Calendar tabs, are in A Worker's Inbox and Calendar.
The Runtime: Size and Execution Mode
After this section you will be able to choose how much computer a worker gets and how it runs. Under Runtime you decide the machine and the mode:
- Container size. The size of the container the worker operates, chosen from the sizes your organization's container policy allows and shown with its memory, for example Standard (4 GB). Larger sizes draw more credits while running; start with the smallest that covers the work and raise it only when a task needs it.
- Execution mode. How the worker carries out a task:
- Claude Code (container). The default. The worker runs coding agents inside its own container, one per slot. Each slot runs one tool, Claude Code, Codex, Gemini CLI, Kimi Code, Cursor Agent, or Devin, signed in with a provider account the worker links. In this release a slot does not run on Universal Usage Credits, so link an account for each tool the slots run; see AI Connection and Budgets. This is the mode for hands-on project and code work, and the slots, their tools, and their memory are laid out in Configure step 2.
- In-app assistant. The worker runs on the platform's AI over your usage credits, with no container to configure. This is the simplest mode, suited to support and inbox work that needs no container.
- Hybrid. The worker can do both: light in-app work and container-backed coding work, choosing per task.
Which execution mode should a support worker use? In-app assistant, when the job is reading tickets and drafting replies: it runs on your usage credits with nothing else to set up. Choose the container mode for workers that need to edit code, run tools, or drive a desktop.
Operating Instructions
After this section you will be able to tell a worker how to do its job. Under AI settings, Operating instructions holds an optional System instructions field that the worker follows on every task, up to twenty thousand characters. This is where you set its tone, its boundaries, and the specifics of your process: how to greet a customer, what it must never promise, when to escalate to a human rather than answer, and which of your policies apply. Clear operating instructions are the single biggest lever on whether a worker's drafts read the way you want, so write them the way you would brief a new hire.
The Schedule: Shift and Holidays
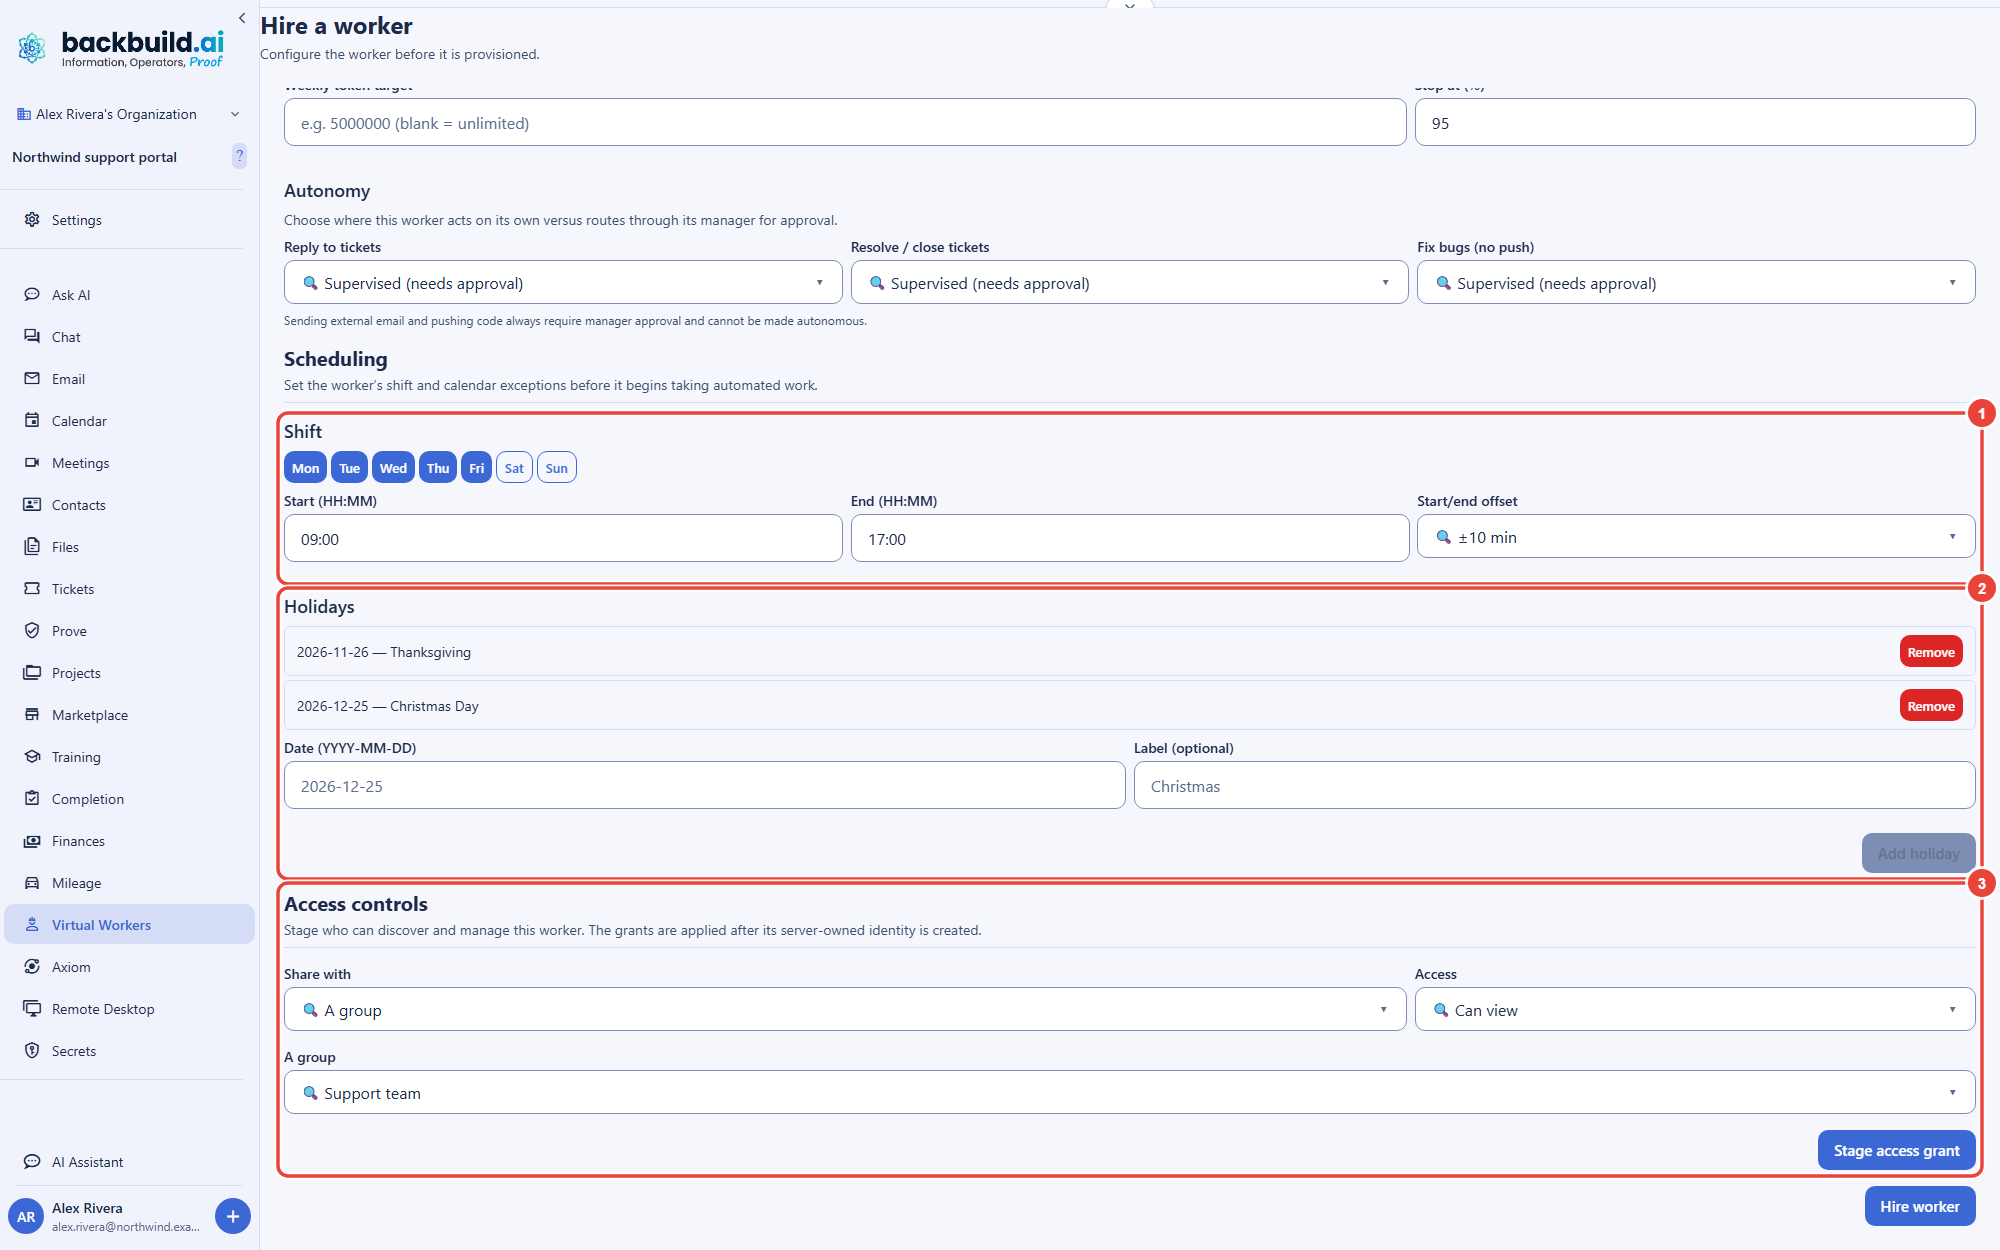
After this section you will be able to set a worker's working hours and days off. Under Scheduling you give the worker human-style hours:
- Work days. Toggle the days Monday through Sunday the worker is on shift.
- Start and end. The daily hours it works, read in the worker's timezone. Off those hours the worker is off shift: it takes up no queued work, and acts only when a person asks it something directly, such as in Chat.
- Start and end offset. An optional small randomized jitter (exact, or plus or minus five, ten, or fifteen minutes) so the worker does not begin at the same instant every day.
- Holidays. Add specific dates, each with an optional label. On a holiday the worker is off shift for the whole day.
Shifts are how a worker gives you off-hours coverage without acting at times you did not intend. A support worker on an evening shift picks up tickets after your human team logs off; a worker with the weekend switched off simply waits until Monday. Work that arrives off shift is not lost: it queues and the worker takes it up when its next shift begins.
Sharing a Worker
After this section you will know who else can see a worker, and who can change it. Under Access controls, stage the grants that decide who else can discover the worker. For each one, pick Share with: a group, a department, a project, everyone in this organization, a SaaS package, a specific user, or public across the organization, and the target where one is needed. Then choose Can view or Can edit and select Stage access grant. The staged grants are applied when the worker is hired. A person a worker is shared with finds it on their roster, can read its Overview, and finds it in Chat unless it is hidden there. Having the worker itself answer a chat, by choosing it under Run on, needs a Can edit grant. In this release a Can edit grant does not open the Configure wizard or the worker's controls to them: those stay with the person who hired the worker and with your organization's owners and administrators, within the limits The Configure Wizard sets out.
What You Can Change After Hiring
After this section you will know which choices are made once. After hiring, the worker's Configure wizard revises its name, job title, timezone, inbox, status, container size, slots, permission role, vault, AI accounts, autonomy, help desk workload, shift, and holidays. The execution mode, the manager, the operating instructions, the weekly token target, and the access grants are set on the hire form, so choose them deliberately.
Pausing and firing live on the worker's own page, as Pause worker and Fire worker, and the roster card also offers Fire worker. Firing does not destroy a worker: it moves to the Deactivated tab and can be re-hired later with its configuration intact, so letting a seasonal worker go and bringing it back takes two clicks. See The Worker Page.
Where to Next
- AI Connection and Budgets: connect the worker to usage credits or a provider account, and set its usage limits.
- Autonomy and Approvals: record, per capability, what the worker may do on its own, and what the platform enforces.
- Support Workers: put a hired worker to work on your help desk.
- Developer Workers: put a hired worker to work on code in a container.