

Configuring a Worker: The 8-Step Wizard
Once a worker is hired, the Configure tab is where you set up everything it needs to work on its own schedule. It is an eight-step wizard, in prerequisite order: identity, runtime, permissions, credentials vault, AI accounts, autonomy and workload, vault access and scheduling, then review and activate. Each step is a small, plain set of choices, and Back and Next both save as you go, so configuring a worker is a checklist you can complete in one sitting and revise any time. After this page you will be able to walk every step, give the worker an inbox, size its slots to its memory, link its AI accounts, record what it may do on its own, and activate it with confidence about what it can and cannot touch.
Configuring a worker is a permissioned action governed by your organization's roles and permissions. The wizard is open for editing to the person who hired the worker and to your organization's owners and administrators; anyone else who can see the worker sees its steps read-only. In this release an owner or administrator who did not hire the worker can save its status, drain, permission role, where it runs, autonomy, help desk workload, shift, and holidays, but a change to its name, job title, or timezone, its inbox, Available in Chat, its container size and slots, its usage re-check, its credentials vault, its AI accounts and usage throttle, or its additional vault access is refused unless the worker is shared with them as Can edit. A worker can never be granted a permission beyond what the three worker roles carry, whoever configures it, so it can never hold organization administration, billing, or identity-and-access management. See Security and Governance.
How the Wizard Works
After this section you will know how to move through the wizard and how it saves. The eight steps run along the top as numbered circles; a step you have passed shows a check mark. Move with Back and Next, or click any step to jump to it: every step is always reachable. Both Back and Next save the current step before they move, and a page-level Save lights up whenever there is an unsaved change and switches off once everything is saved, so you never lose a setting by moving between steps; select Save before you leave the Configure tab. One action inside a step depends on an earlier one: linking an AI account in step 5 needs the credentials vault from step 4, because a worker cannot store a linked account until it has a vault to keep it in. Until then the link buttons stay disabled and say why, while the rest of step 5 can still be set.
Step 1: Identity and Status
After this step you will be able to say who the worker is, where its mail goes, and whether it is working.
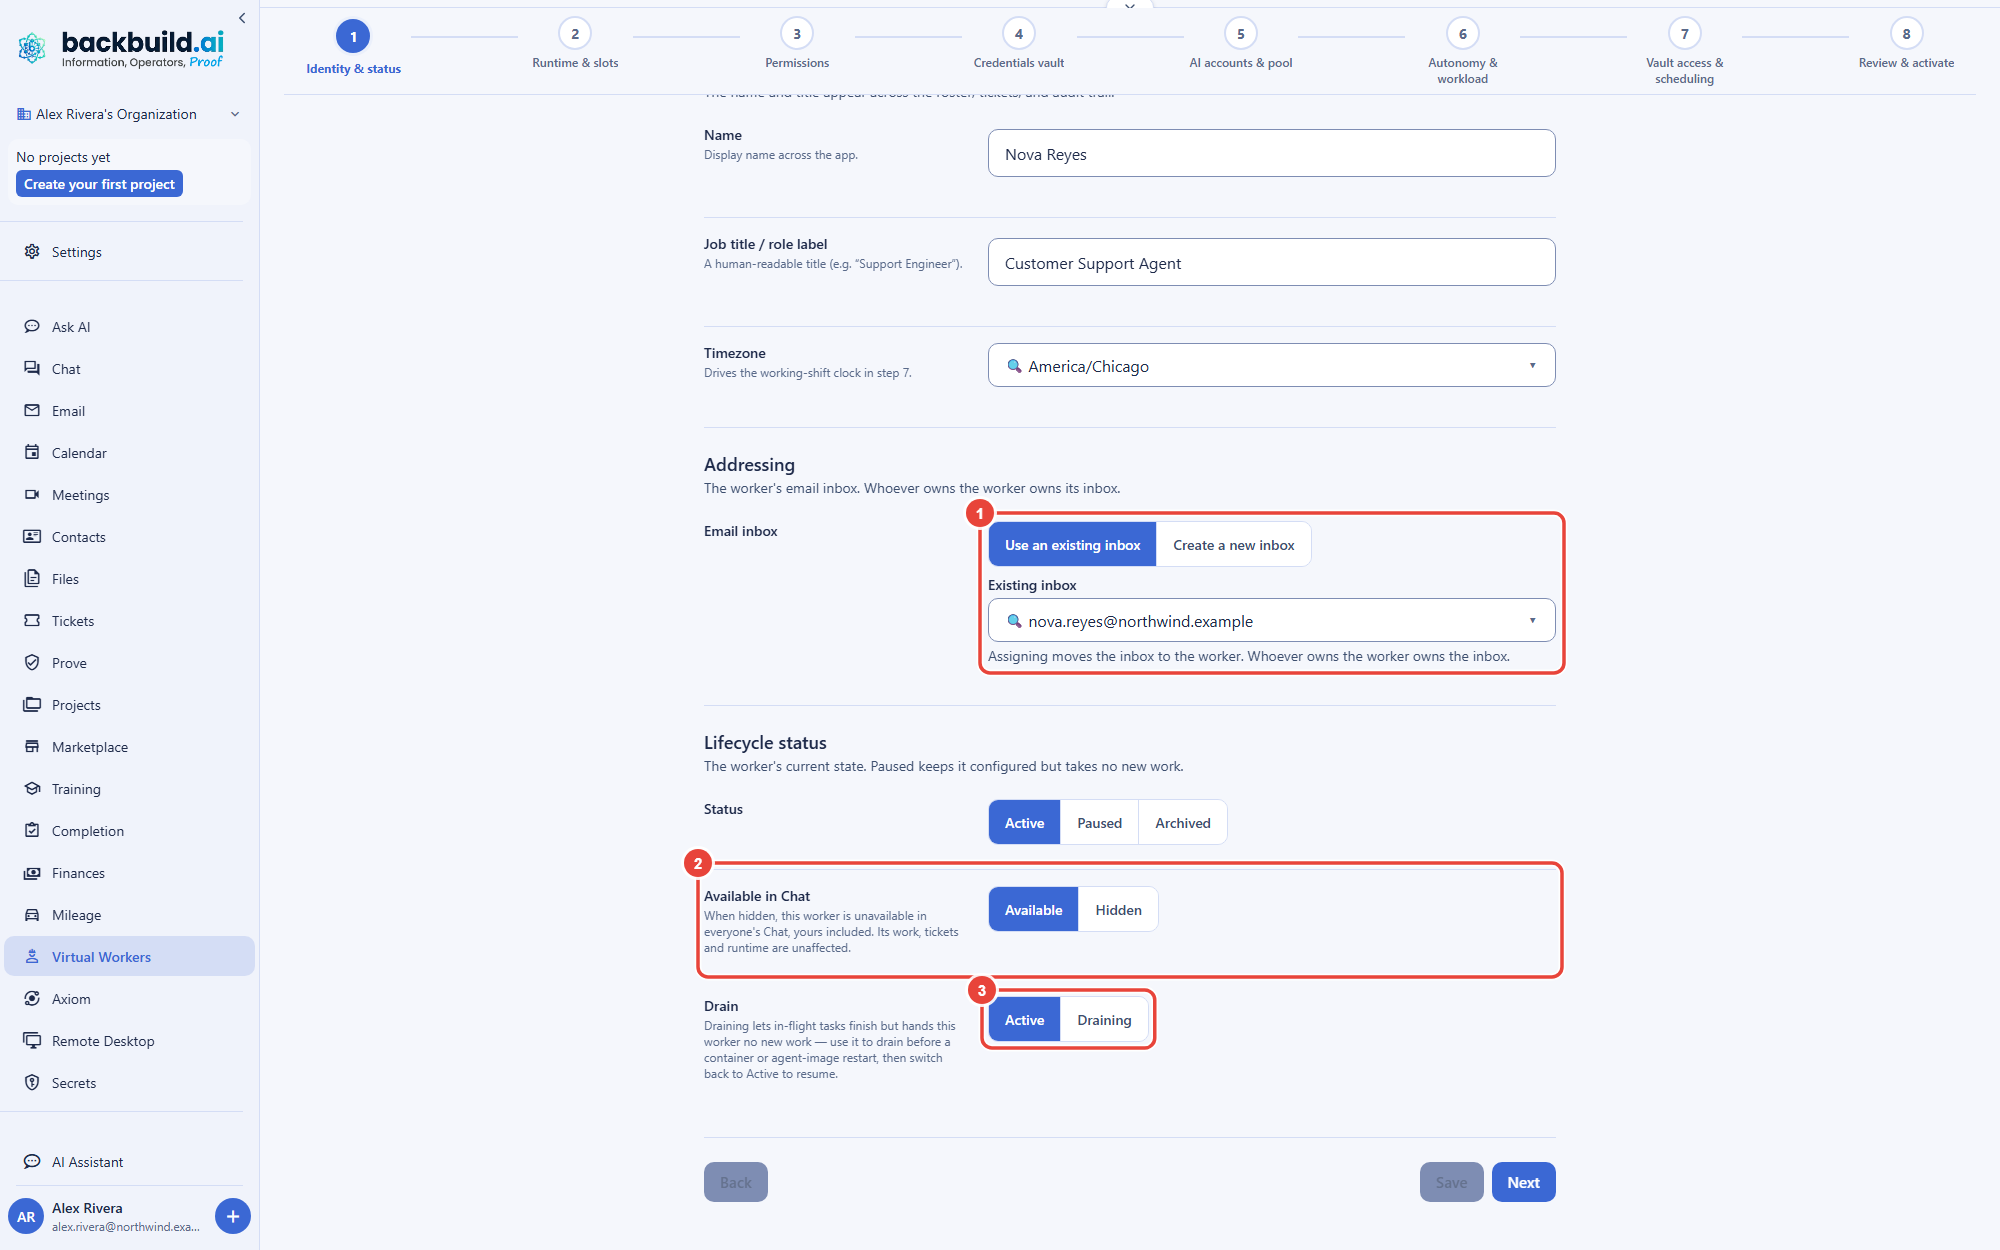
- Name, job title, timezone. Editable in place. The name and title appear across the roster, tickets, and the audit trail; the timezone drives the working-shift clock in step 7.
- Addressing. The worker's email inbox. Choose Use an existing inbox to assign an inbox you own, or Create a new inbox to create one on a verified domain and assign it in one action with Create inbox and assign. Whoever owns the worker owns its inbox. The rules, and the Email tab that appears once the worker has an inbox, are in A Worker's Inbox and Calendar.
- Status. Active, Paused, or Archived. Pausing keeps everything configured but hands the worker no new work; in-flight tasks finish. Archiving deactivates the worker, the same as Fire worker: it moves to the Deactivated tab with its configuration kept, so you can re-hire it later.
- Available in Chat. Hidden makes the worker unavailable in everyone's Chat, yours included. Its work, tickets, and runtime are unaffected, and it can still be chosen under Run on in Ask AI.
- Drain. Draining lets in-flight tasks finish but hands the worker no new work, while its container keeps running. The step counts the tasks still in flight and then reports that the worker is fully drained and safe to restart. Switch back to Active to resume. To drain and close the container in one action, use Drain on the worker's page; see The Worker Page.
Step 2: Runtime and Slots
After this step you will be able to size the worker's container, choose where it runs, and lay out its slots so they fit in its memory. A worker runs in exactly one container, and the container runs one or more slots: concurrent workstreams, each running one coding tool.
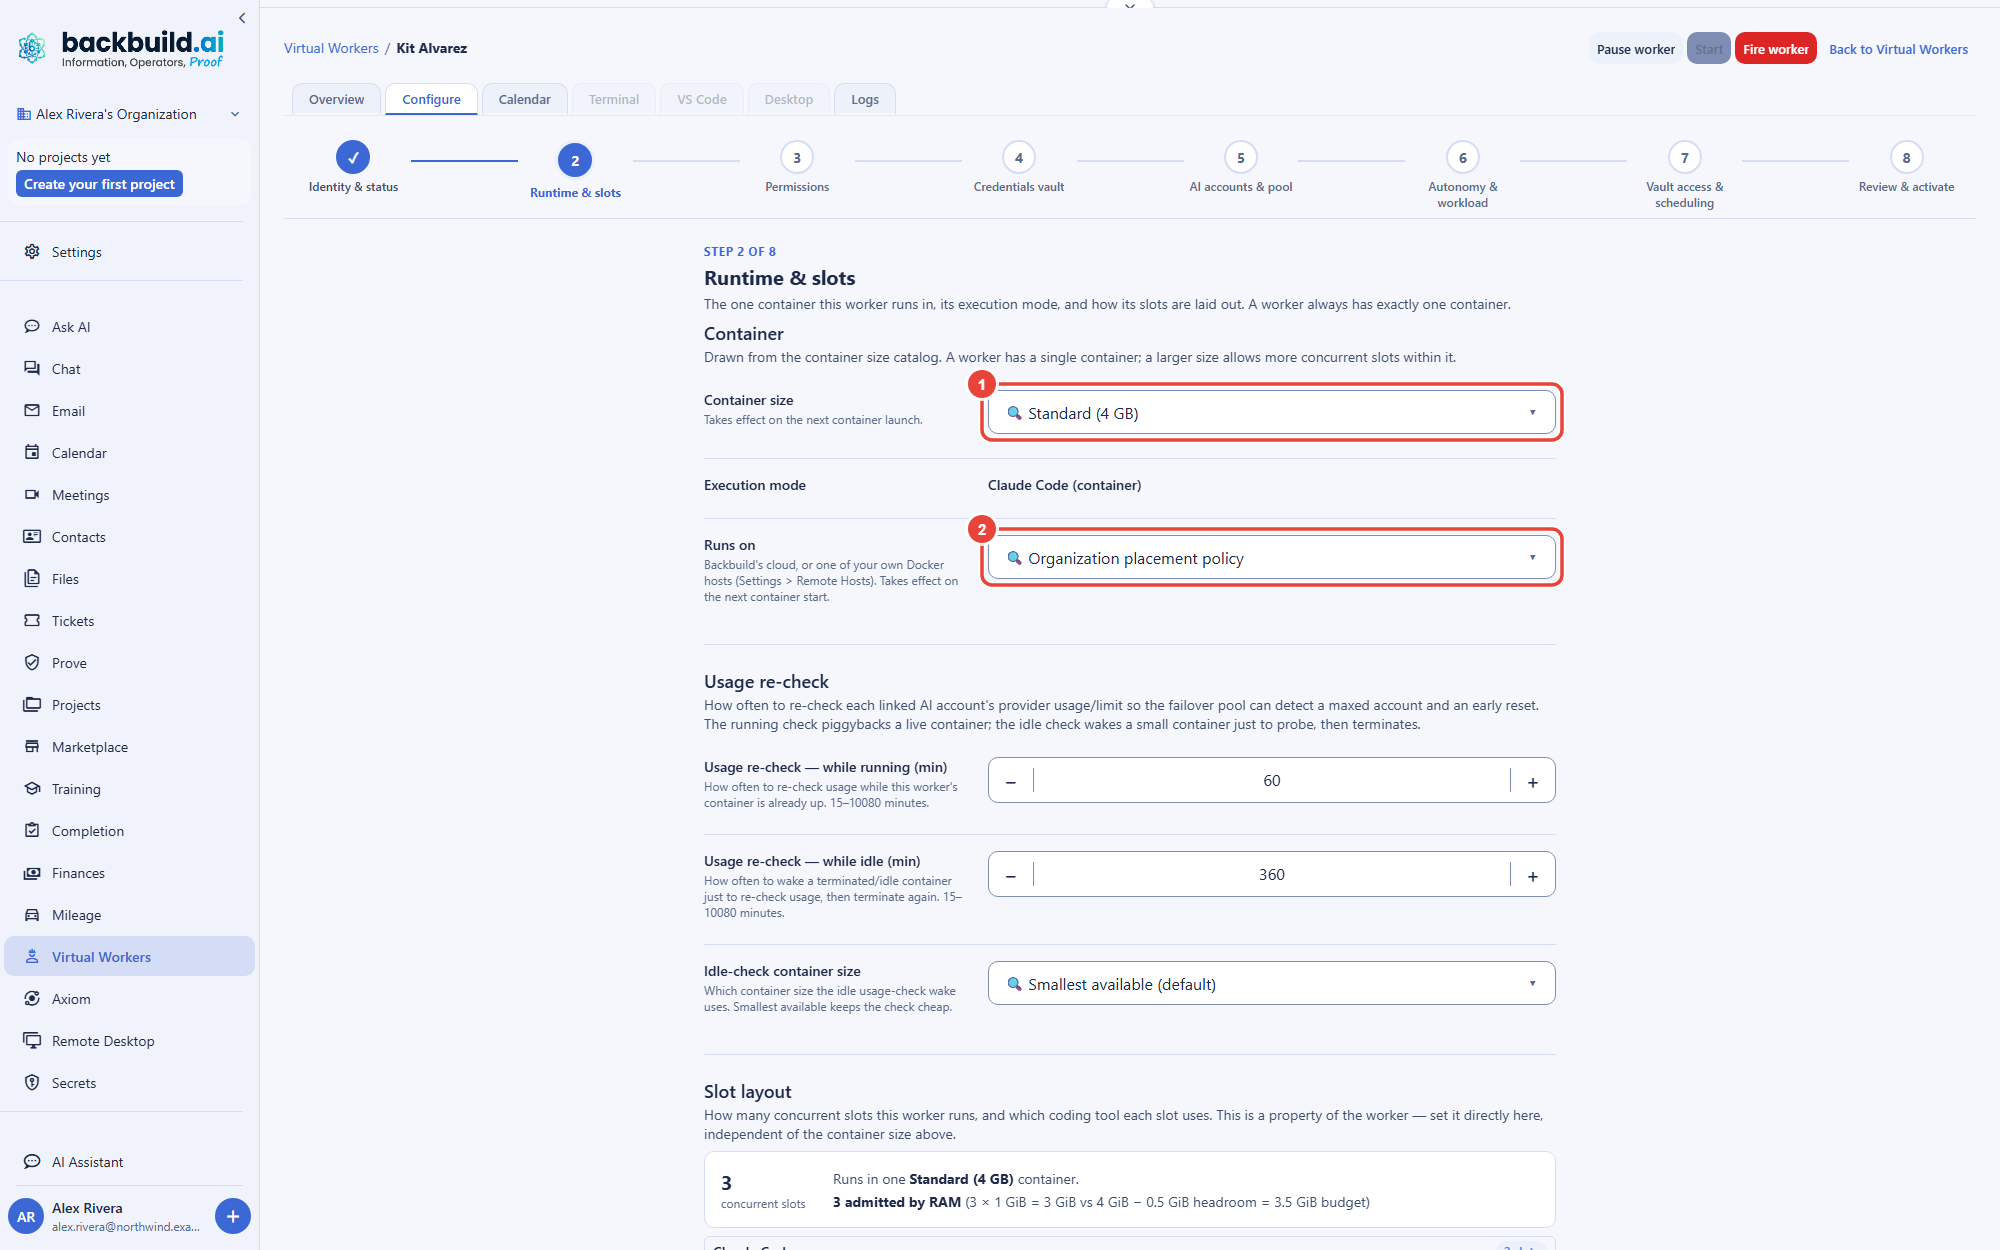
- Container size. Chosen from the sizes your organization's container policy allows, each shown with its memory, for example Standard (4 GB). The size is the memory and CPU envelope the slots share, and larger sizes draw more credits while running. A change takes effect on the next container launch.
- Runs on. Where the worker's container runs: Organization placement policy (Backbuild's cloud, unless your organization places workers on its own Docker hosts), or pinned to one of your organization's own Docker hosts. Save it with Save run location; it takes effect at the worker's next container start, and if the chosen host is not running with Docker ready the field says so. Docker hosts are added under Settings, then Administration, then Remote Hosts; see Remote Hosts.
- Usage re-check. How often, in minutes from 15 to 10,080, the worker re-checks each linked AI account's provider usage while its container is running; these checks keep the 5-hour and weekly usage meters current. The step also has a while-idle interval and an Idle-check container size, meant for waking a stopped container just to run the check. In this release they are saved but nothing acts on them, so an account's meters are refreshed only while the worker's container is up.
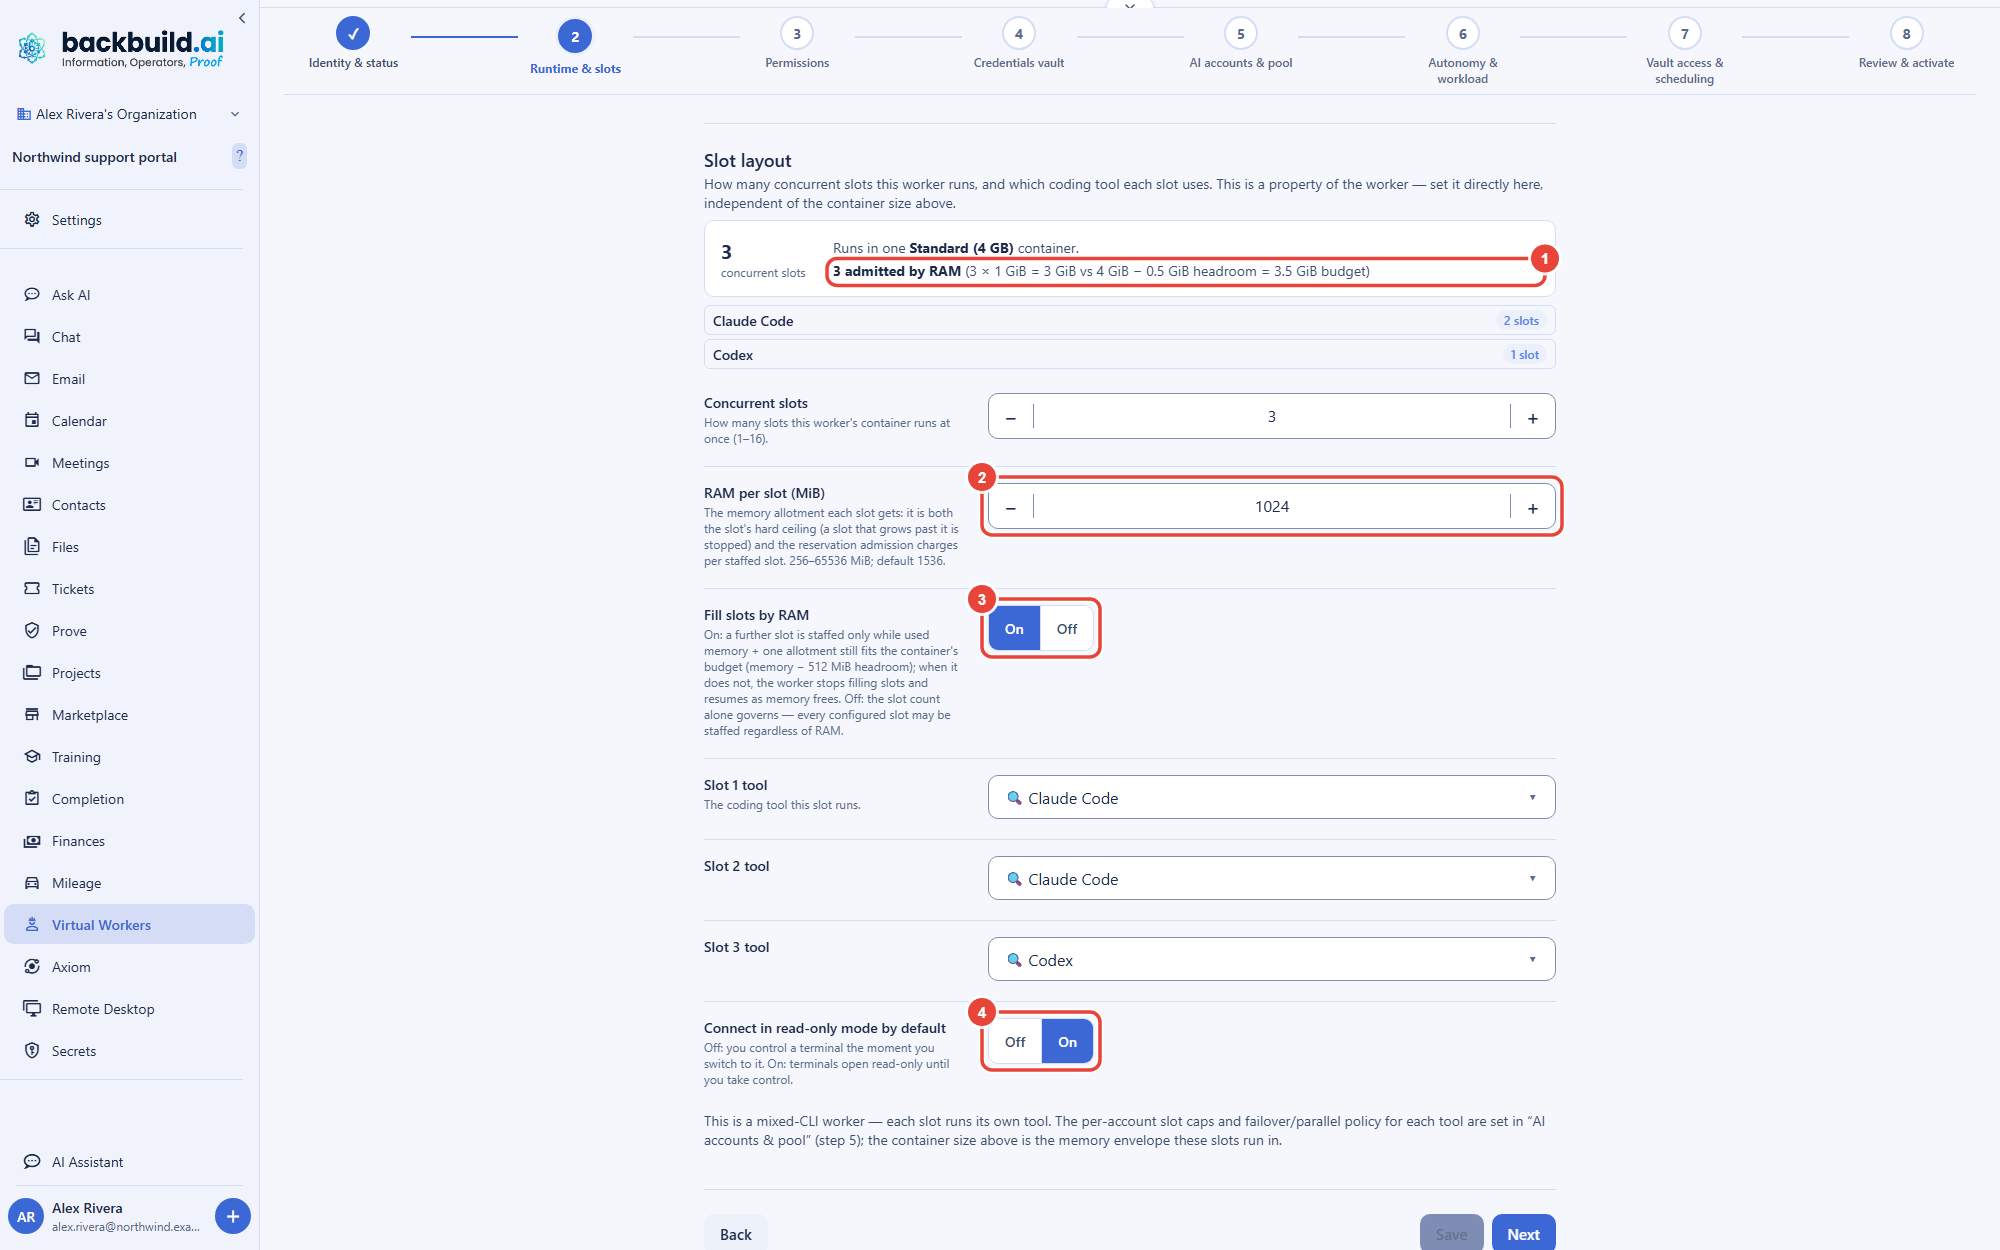
- Concurrent slots. How many slots the container runs at once, from 1 to 16. Each slot then gets its own Slot N tool: Claude Code, Codex, Gemini CLI, Kimi Code, Cursor Agent, or Devin. Every slot can run the same tool, or you can mix tools, in which case the step calls it a mixed-CLI worker.
- RAM per slot (MiB). The memory each slot gets, from 256 to 65,536 MiB, 1,536 by default, in steps of 256. It is both the slot's hard ceiling, so a slot that grows past it is stopped, and the amount reserved for each slot that is staffed.
- Admitted by RAM. The tile above the fields does the arithmetic for you: the slots times the allotment against the container's budget, which is its memory less 512 MiB of headroom, and how many slots that budget admits at once. When the slots would not all fit, a warning names the options: lower the RAM per slot, reduce the slots, or pick a larger container. If not even one slot fits, the save is refused.
- Fill slots by RAM. On (the default): a further slot is staffed only while the memory in use plus one more allotment still fits the budget; when it does not, the worker stops filling slots and resumes as memory frees, and the Overview shows the worker as RAM-capped. Off: the slot count alone decides, and every configured slot may be staffed regardless of memory.
- Connect in read-only mode by default. Off (the default): you control one of the worker's terminals the moment you switch to it. On: its terminals open read-only until you choose Take control, so watching a worker never means typing into its session by accident.
The per-account slot caps and the failover or parallel policy for each tool are set in step 5; the container size above is the memory envelope these slots run in.
How does container size map to cost? The size sets the compute a running worker draws from your usage credits, for as long as its container is up, including the time between tasks. Pick the smallest size that covers the work, and use the schedule in step 7 to keep it off when you do not need it.
How many slots should I give a worker? As many as its accounts and its memory can serve. The admitted-by-RAM count tells you how many the container can staff; the effective capacity in step 5 tells you how many its accounts can drive. The smaller of the two is what the worker really runs.
Step 3: Permissions
After this step you will be able to see exactly what the worker is allowed to touch. A worker uses the same identity and access model as a human member: your organization's existing IAM roles, groups, departments, and policies. This step picks its role and shows the permissions that resolve from it.
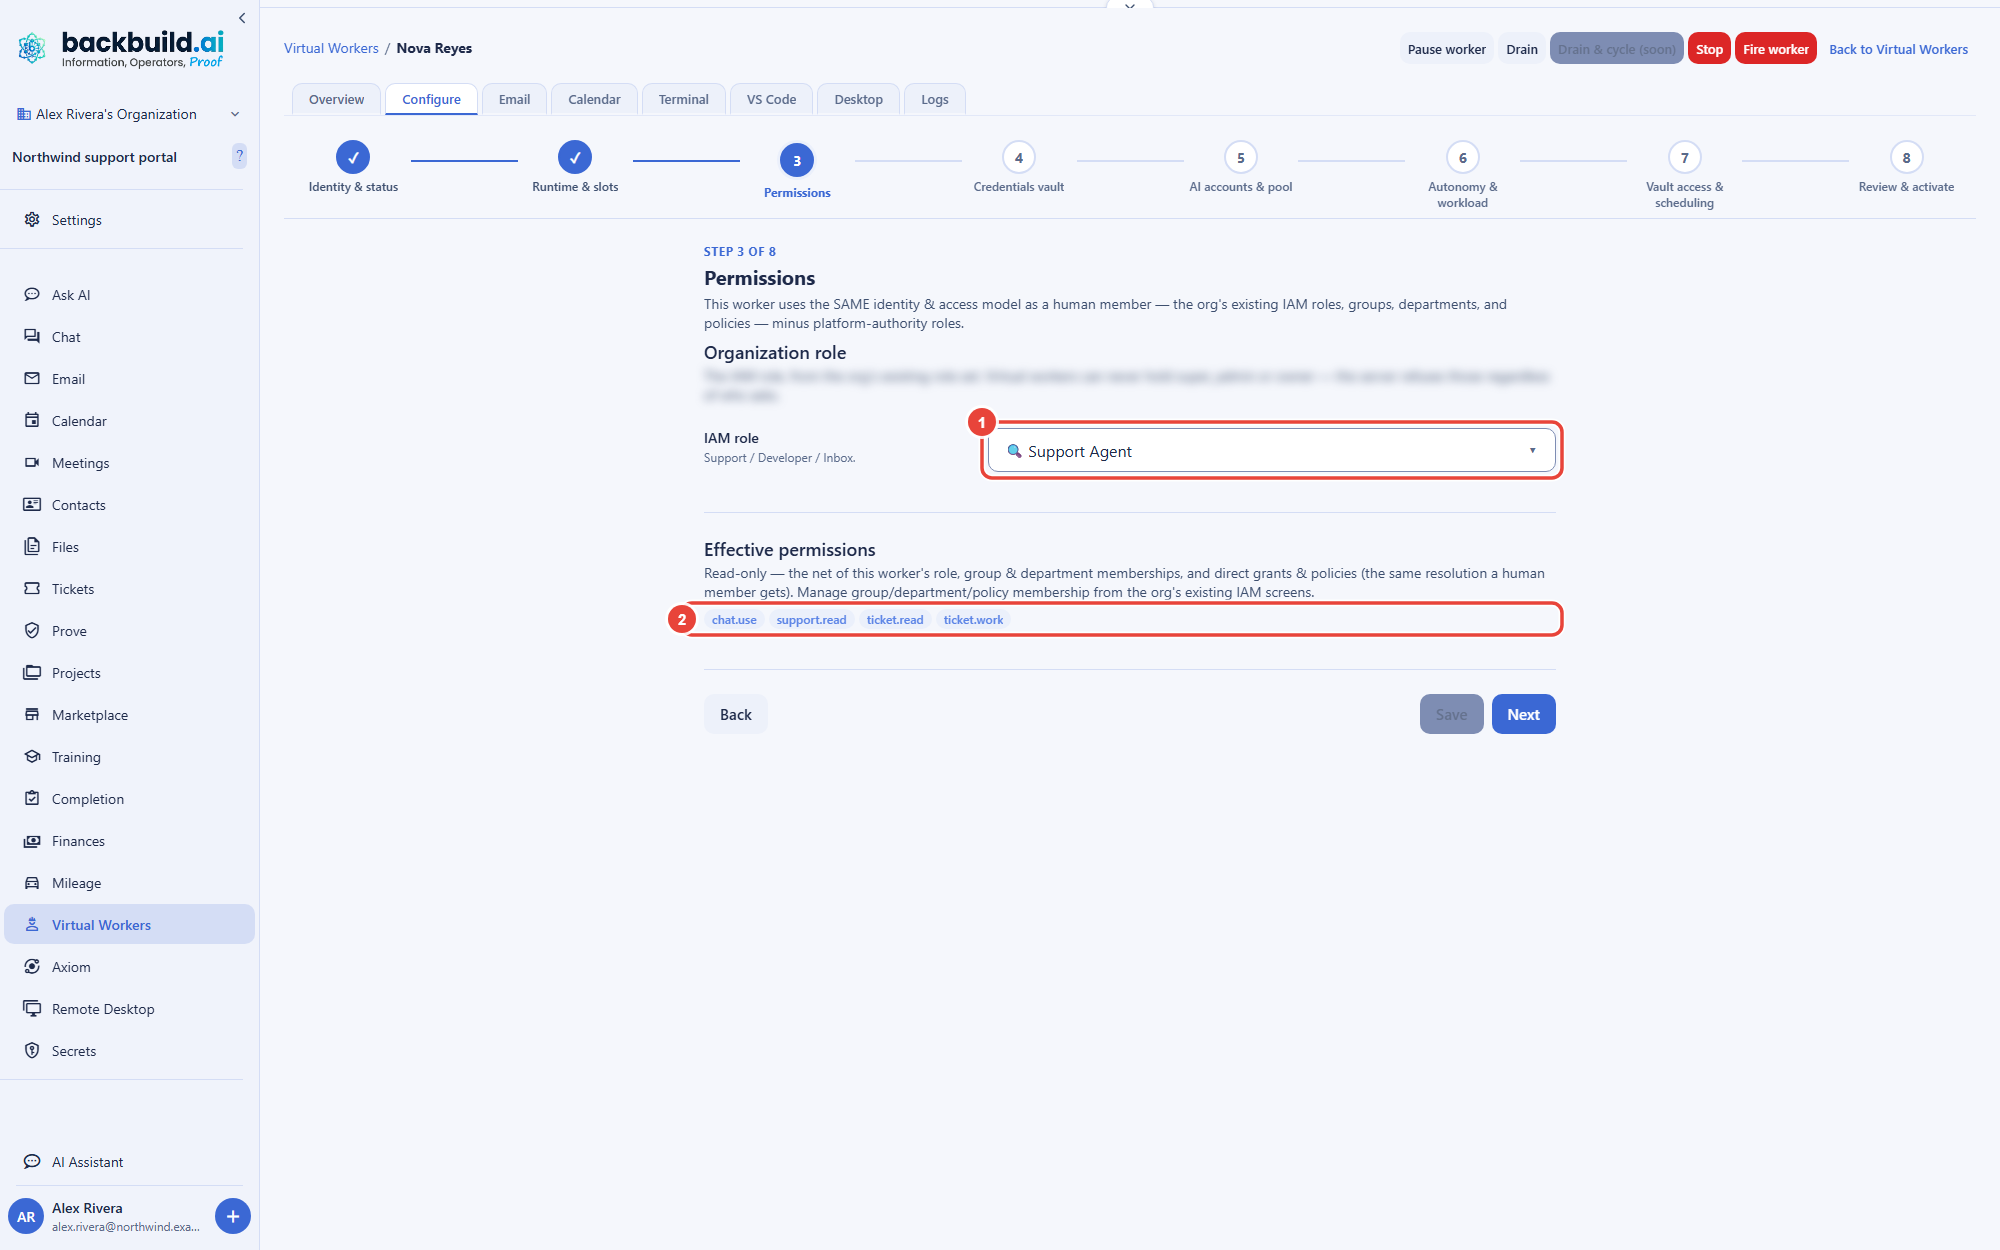
- IAM role. One of your existing IAM roles, scoped to virtual-worker use: Support Agent, Developer, or Inbox Manager. Choose the smallest role that covers the job.
- Effective permissions. Read-only. This is the net of the worker's role, its group and department memberships, and any direct grants and policies, resolved exactly the way a human member's permissions are. You manage group, department, and policy membership from your organization's existing IAM screens.
Two boundaries are worth stating plainly, because a security reviewer will ask. A worker is bound by least privilege: you grant it the narrowest role that does its job, and its permissions are scoped to your organization, so it cannot reach another tenant's data or escalate its own access. And a worker can never be granted a permission beyond what the three worker roles carry, whoever configures it. The wizard shows you the resolved set rather than asking you to trust it. The reserved authority roles, organization administration, billing, and identity-and-access management, are off limits to a worker no matter how it is configured.
Step 4: Credentials Vault
After this step you will be able to give the worker a place to store its own linked-account credentials, safely. This is the step a security reviewer scrutinizes hardest, and it is designed to pass that scrutiny. You bind one zero-knowledge vault to hold the worker's own credentials.
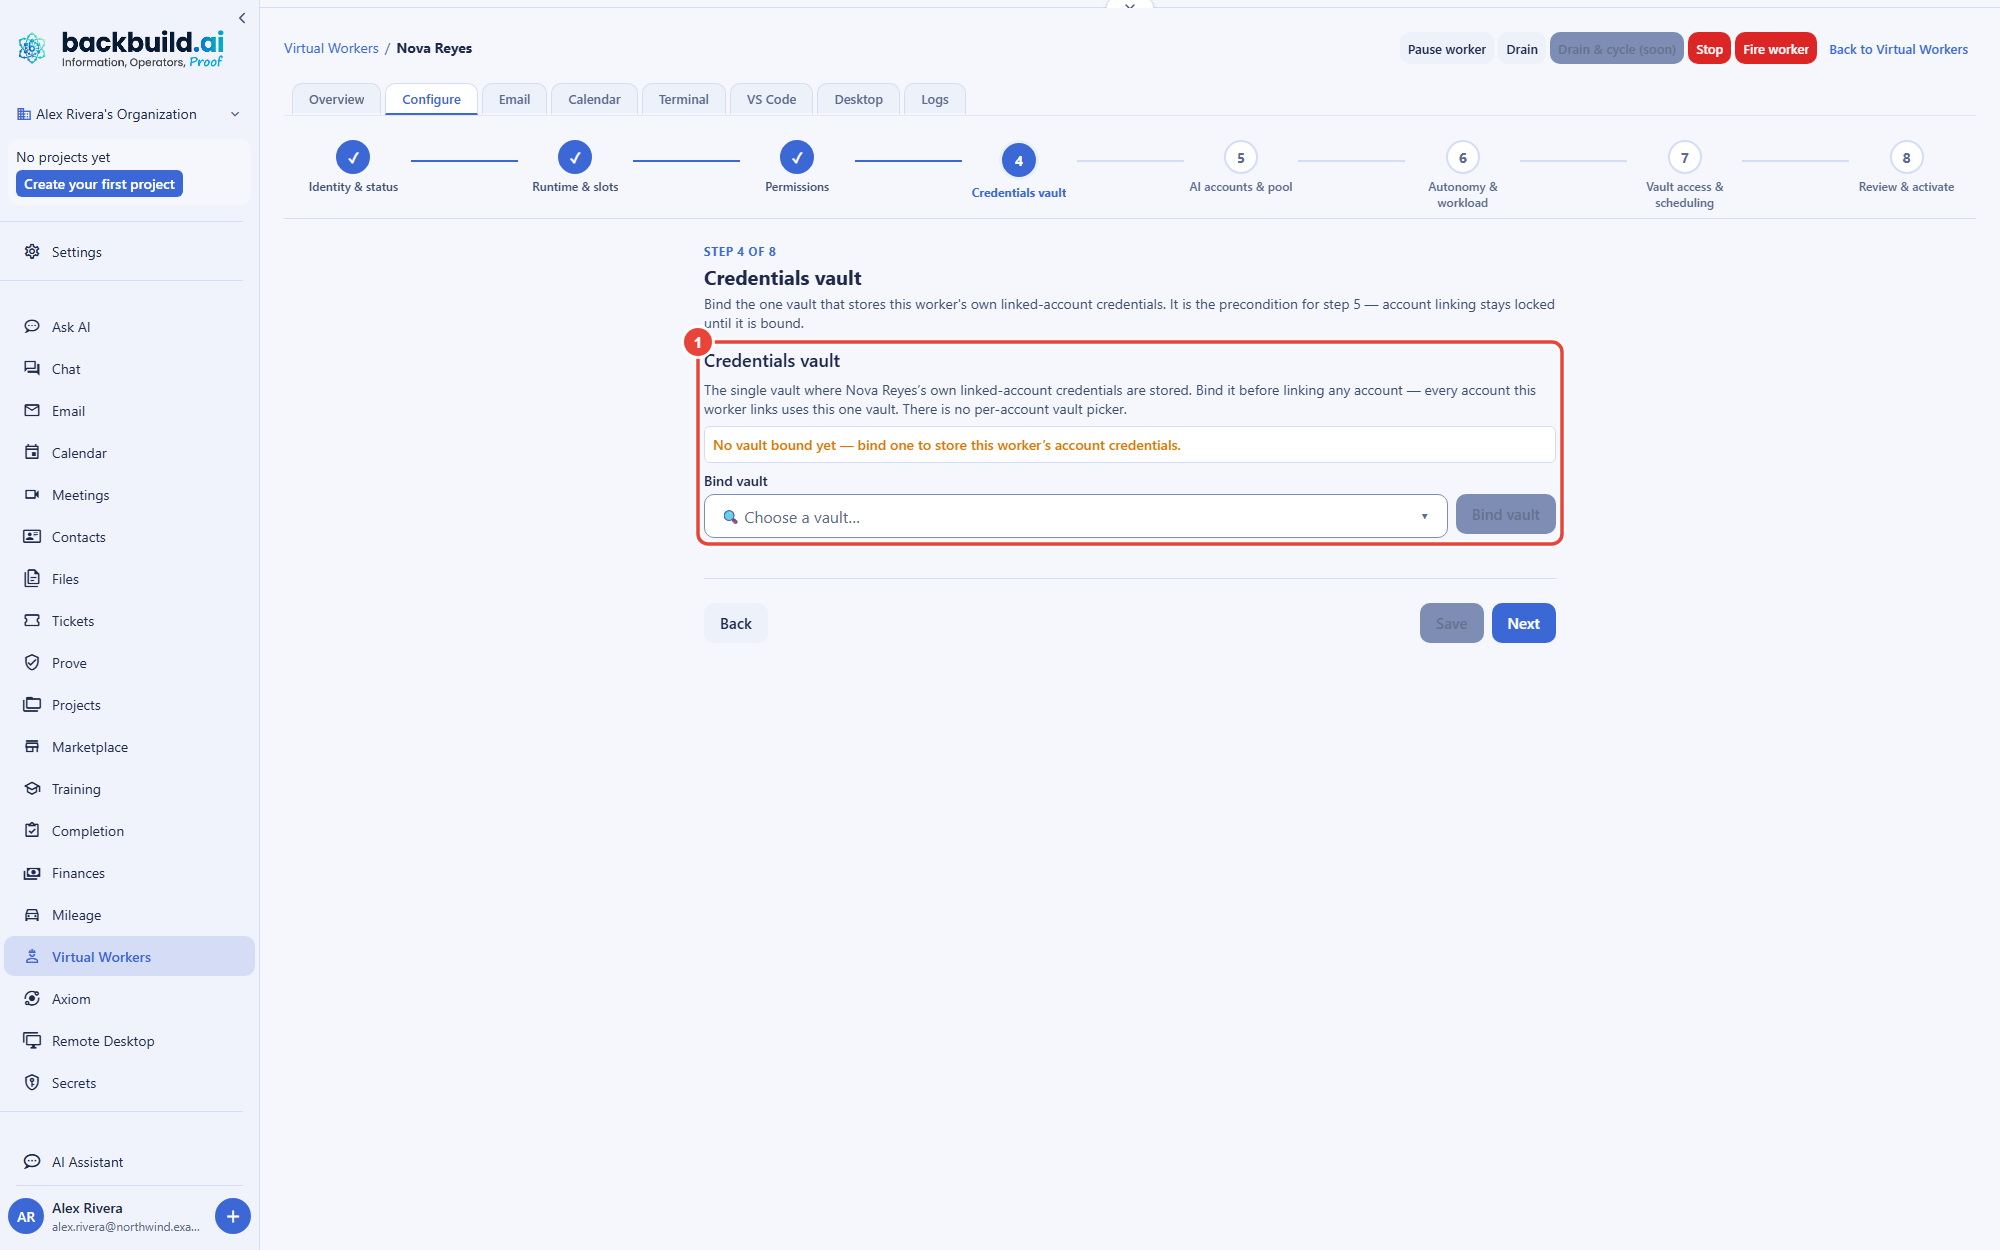
- Unlock. If your Secrets vault is locked, the card shows Unlock the Secrets vault. Enter your master password; the unlock happens in your browser.
- Choose and bind. Pick the vault under Bind vault and choose Bind vault. The card then shows the bound vault and its sensitivity, with Change vault to replace it. Every account the worker links through a provider sign-in is stored in this one vault; there is no per-account vault picker. An API key, the alternative to a sign-in, is encrypted by Backbuild and stored outside the vault.
The vault is zero-knowledge. When the worker later signs in to an AI provider, the resulting credential is captured and encrypted into this vault, each linked account in its own vault item, and it is never shown to the person who configured the worker. When the worker's container starts, each account is restored into the container for the coding tool in its slot: only that slot can read it, and it is not saved in the home folder. The work in that slot runs alongside the coding tool, so link accounts dedicated to the worker. Use a vault created for the worker's credentials rather than a broad shared one, so the worker's reach stays exactly as wide as its job.
Where are the AI credentials stored, and can they leak? A provider sign-in is stored in this bound zero-knowledge vault, each account in a vault item of its own: the credential is captured into the vault directly, never typed into a form, and it is not shown to the person configuring the worker. An API key entered instead, the alternative for tools that support one, is encrypted by Backbuild before it is stored, outside the zero-knowledge vault. Inside the worker's container an account is readable only by its own slot, so the narrower the worker's job, the less that slot's work can reach. See Password and Secrets Vault.
Step 5: AI Accounts and Pool
After this step you will be able to keep the worker inside its provider limits, connect its AI accounts, and choose how it uses them. The step has two parts: the usage throttle at the top, which you can set at any time, and the account pool below it, which links accounts per coding tool once the vault from step 4 is bound.
Usage Throttle and Backoff Table
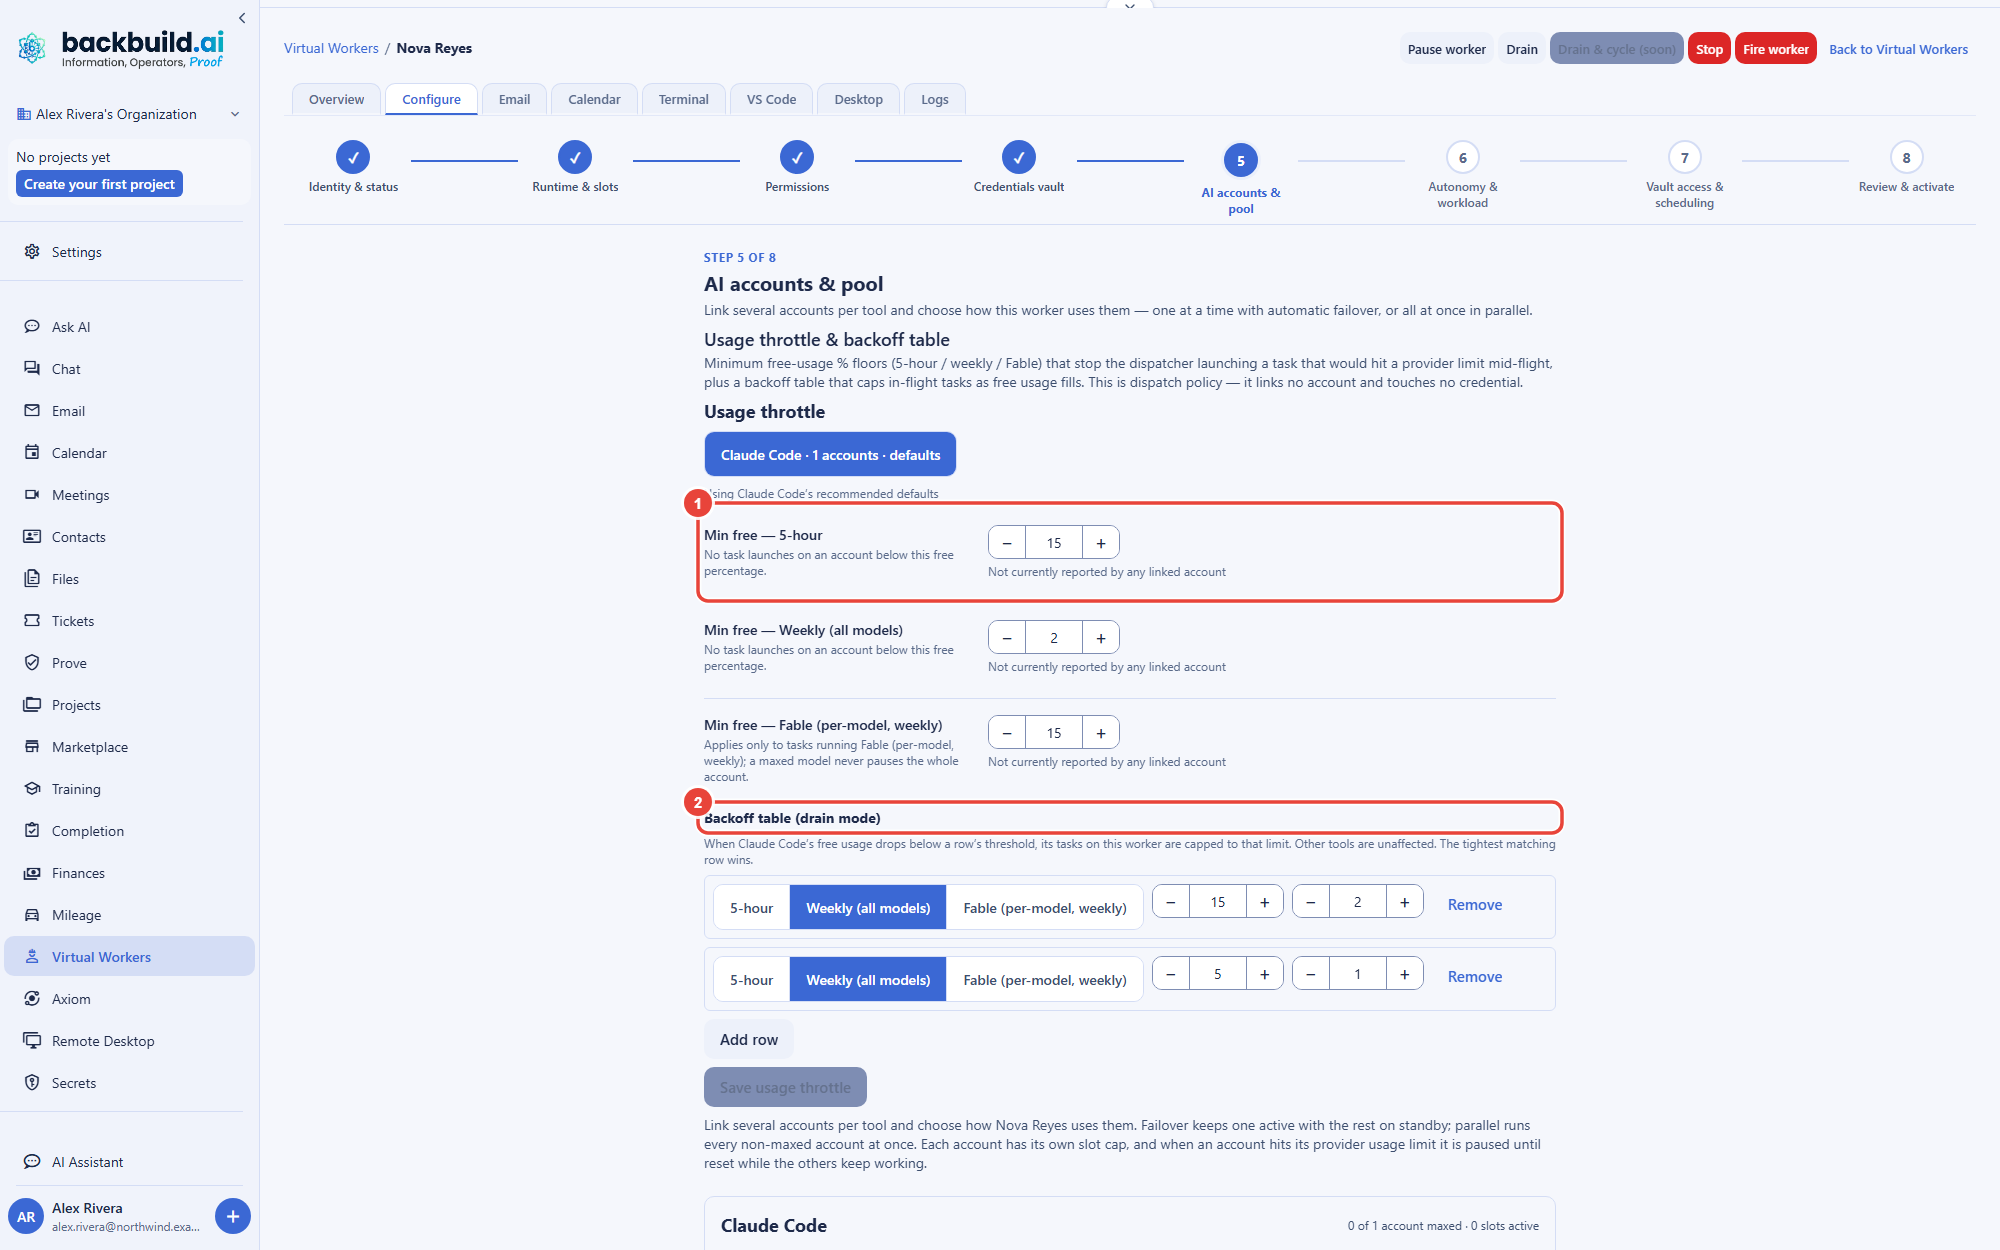
- Choose a tool. The selector at the top lists each tool the worker uses, with how many accounts it has and whether it uses the recommended defaults or your own settings.
- Min free floors. For each usage window the provider reports, such as the 5-hour window, the weekly window, and any model with a weekly limit of its own, a minimum free percentage. No task launches on an account whose free usage is below its floor, so the worker does not start a task that would hit the limit halfway through. A model's own floor applies only to tasks running that model; a maxed model never pauses the whole account.
- Backoff table (drain mode). Rows that cap how many of the tool's tasks run at once as free usage drops: below a row's threshold, the tool's tasks on this worker are capped to that row's limit. The tightest matching row wins, and other tools are unaffected.
- Known and learned windows. Each tool starts with the usage windows Backbuild knows for it; a window no linked account reports yet is marked as not currently reported. A window a provider reports that was not known is learned from an account's usage check. For a tool with no known window yet, the step says so, and no floor or backoff applies until the first check. Save with Save usage throttle, or return to the recommended defaults with Reset to defaults.
The Account Pool
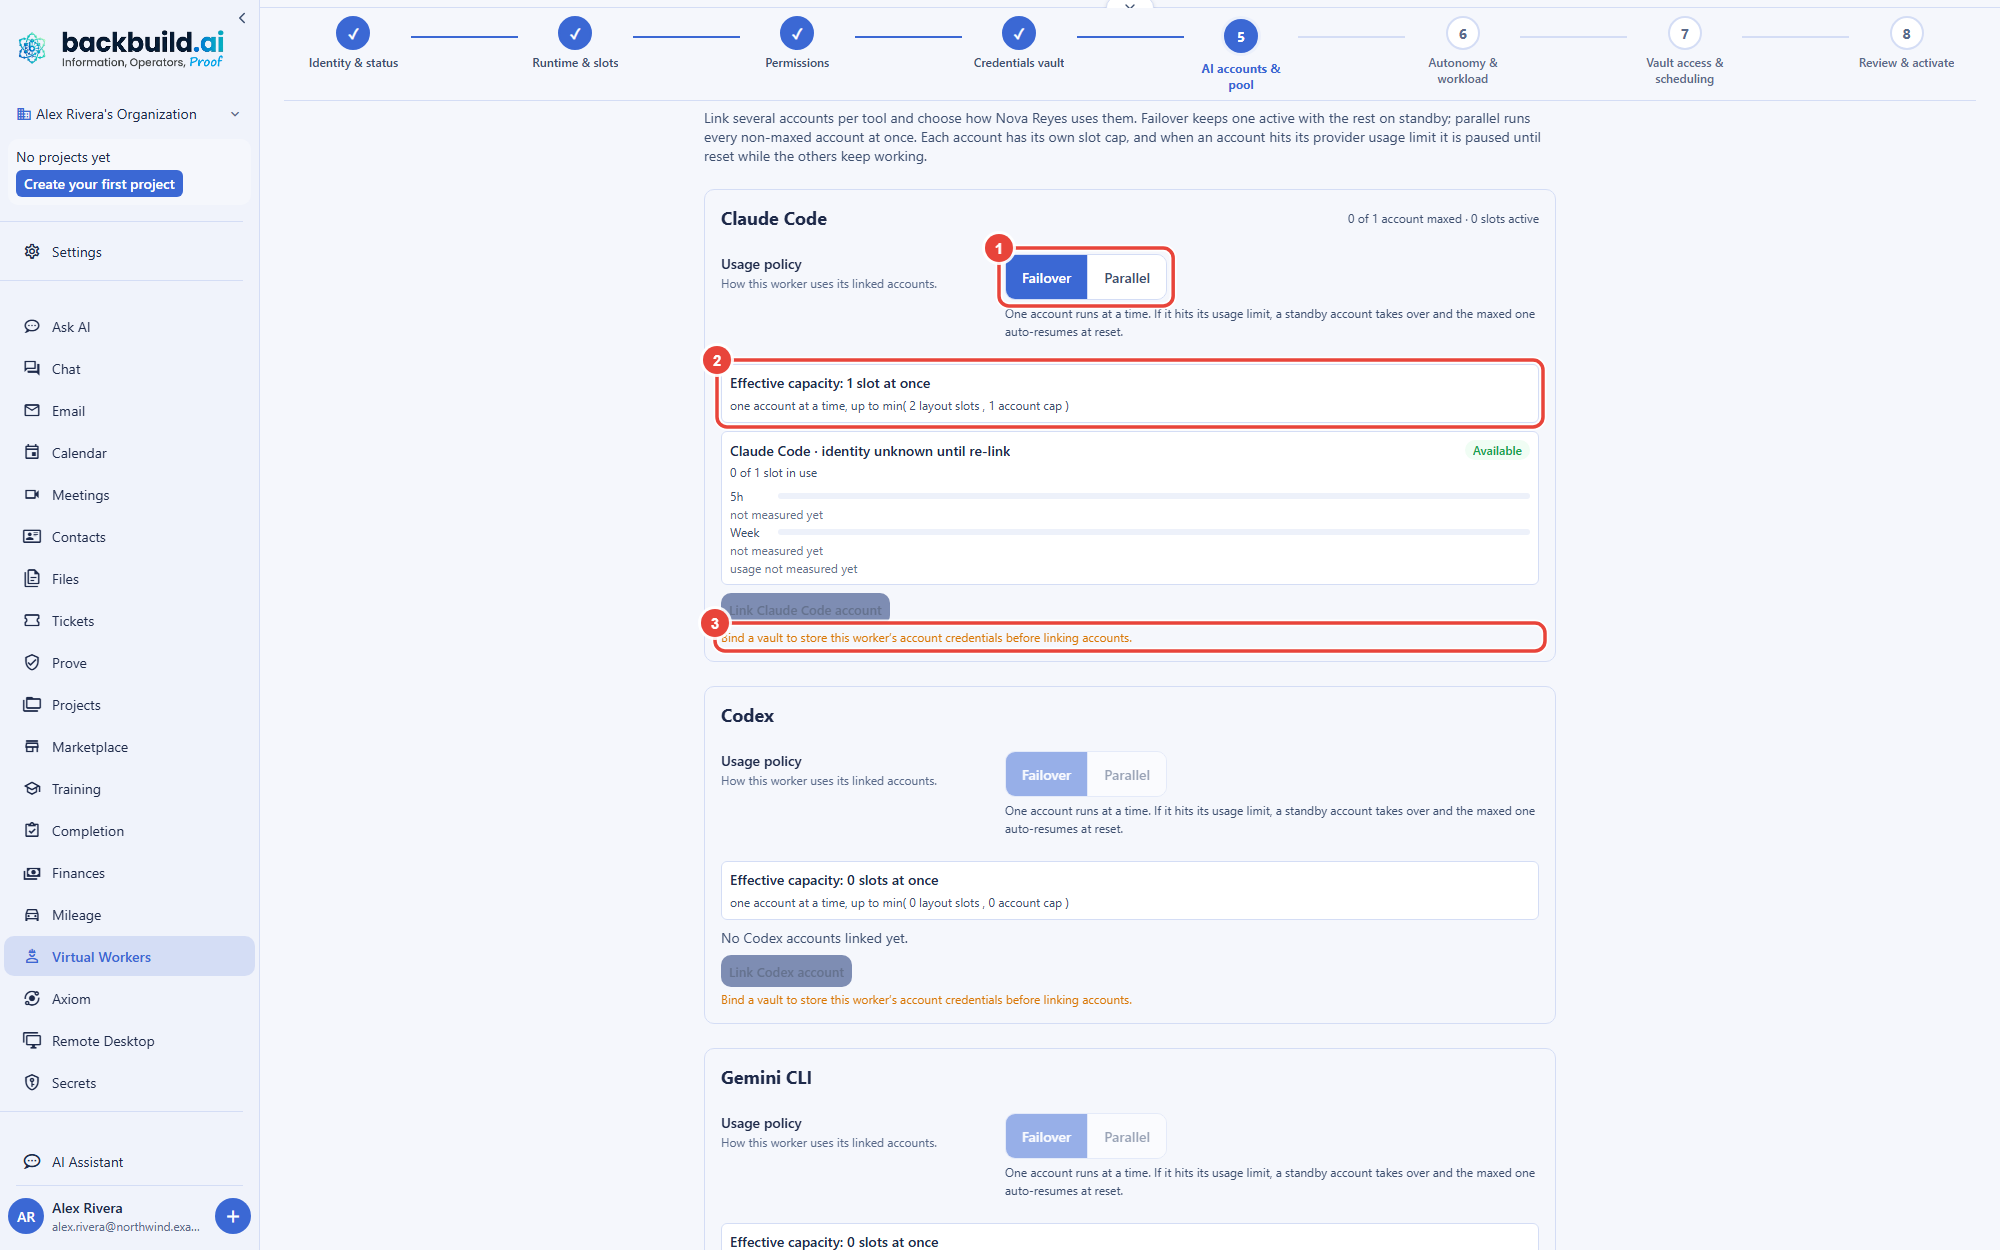
- One panel per tool. Claude Code, Codex, Gemini CLI, Kimi Code, Cursor Agent, and Devin each have their own panel. You bring your own provider accounts, so you are not locked to a single AI vendor.
- Usage policy: Failover or Parallel. Failover runs one account at a time; if it hits its provider usage limit, a standby account takes over and the maxed one auto-resumes at reset. Parallel runs every non-maxed account at once, each up to its own slot cap, for the fastest throughput when you have several accounts.
- Effective capacity. How many slots the tool can really run at once: the smaller of the tool's slots in the layout from step 2 and what its accounts can drive. When the layout is the limit, a warning says so; add slots for that tool in step 2 to use the whole pool.
- Each account. Its row leads with your nickname for it and the provider sign-in it uses, then its state, the slots it is running, its 5h and Week usage meters with their reset times and when they were last measured, and any model with a limit of its own. Rename it with Nickname and Save name (display only, safe on a live account), set its Slot cap from 1 to 1,000, or Unlink it.
- Problems are named. An account whose sign-in the provider revoked shows Sign-in expired · re-link instead of a stale percentage, and two accounts that turn out to share one sign-in are flagged with the fix: re-link one of them. Both are explained on The Worker Page.
Linking an Account
After this section you will be able to start a native sign-in for any tool, as many times as you need. Select Link <tool> account and a large linking dialog opens over the page with a choice of methods. The dialog is always an add-another-account surface: the accounts you have already linked stay listed and managed in the pool behind it, so you can keep adding a second, third, or tenth account for the same tool. It never collapses just because one account is already connected. When you choose Backbuild container, the dialog first offers an optional nickname for the account, so it reads as your name for it in the pool from the start.
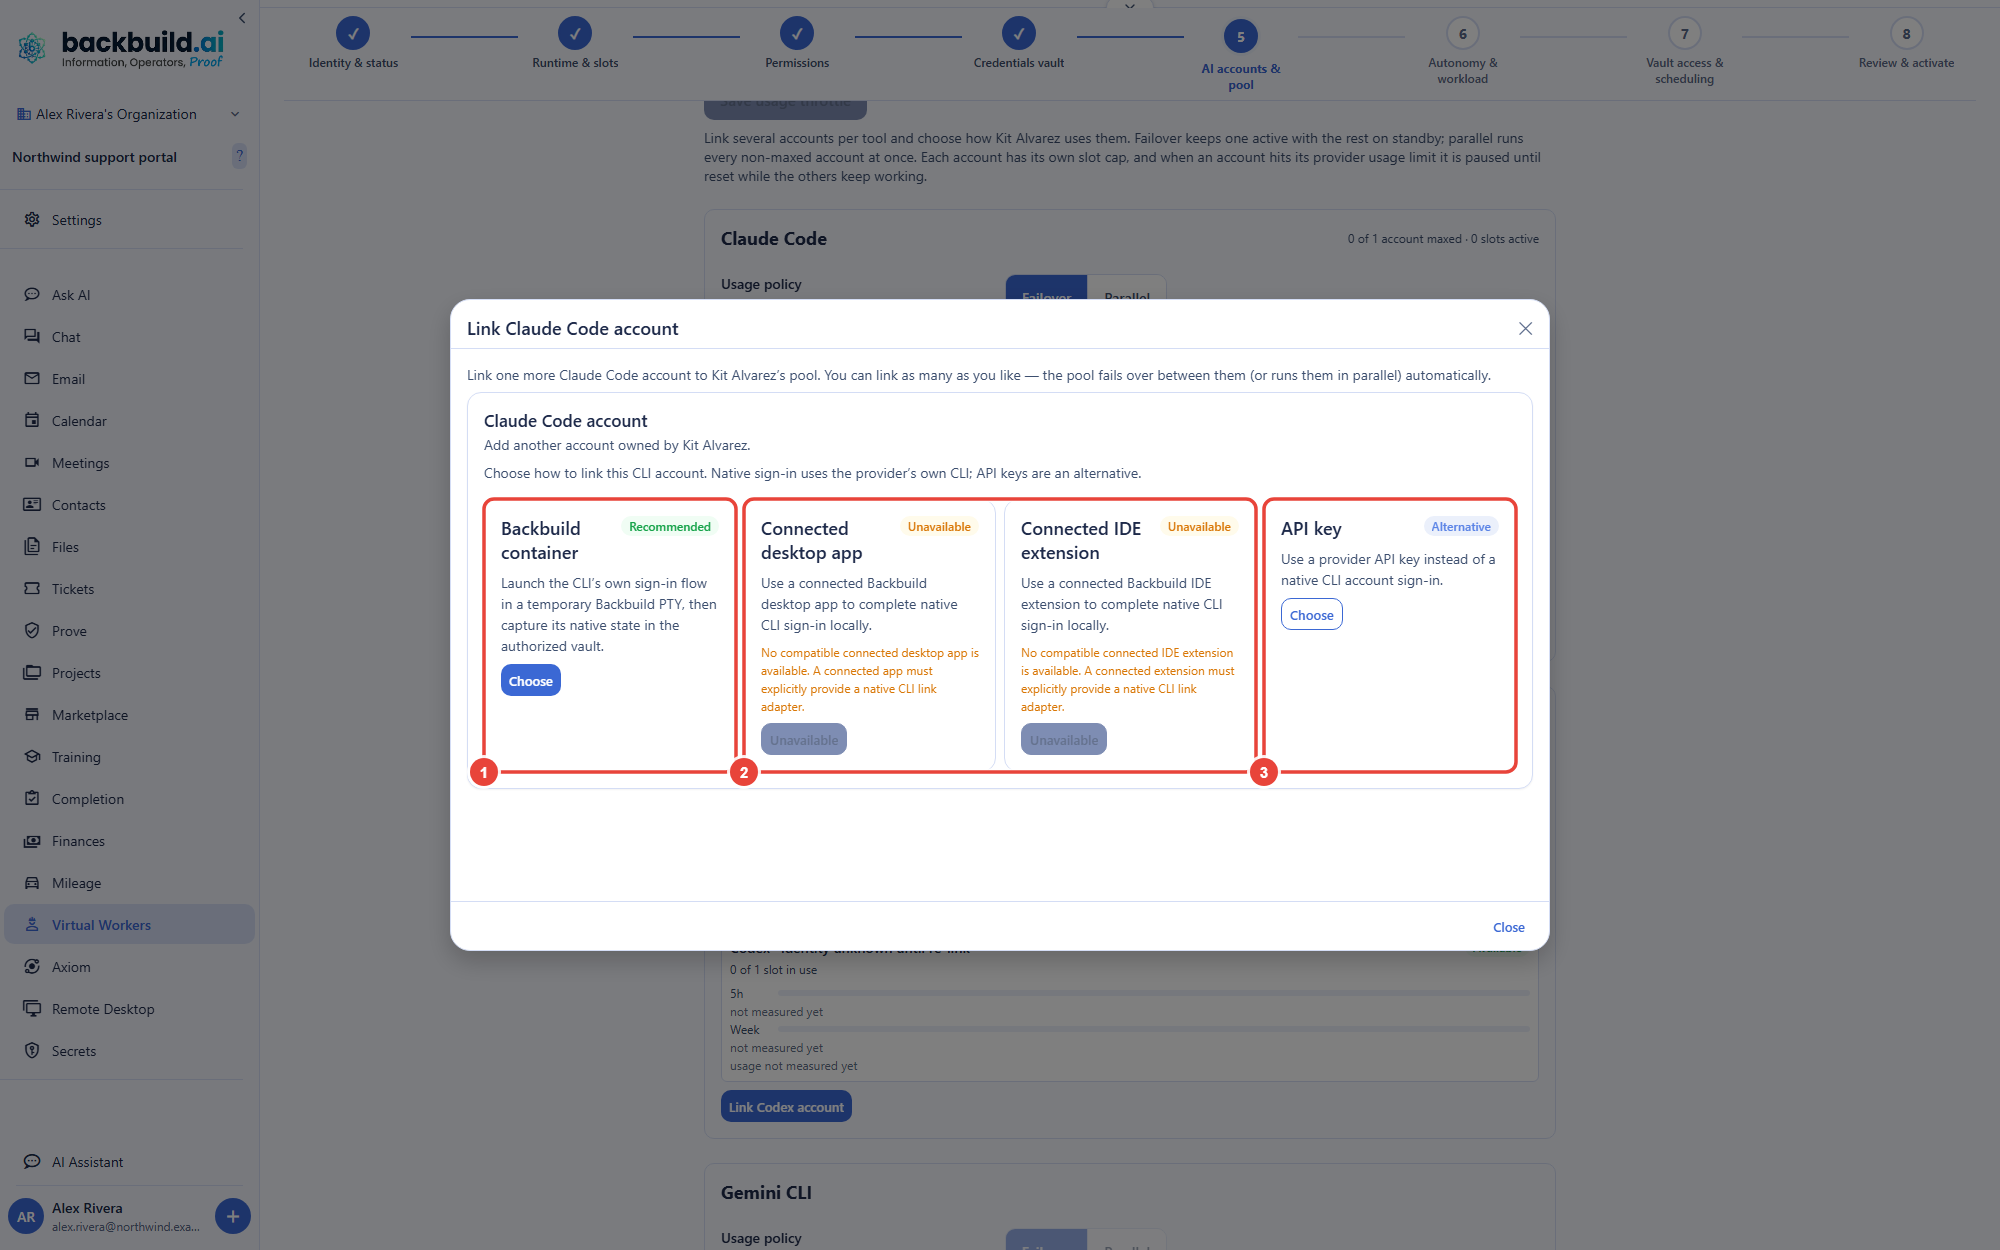
Choose Backbuild container and the provider's own sign-in flow launches in a temporary terminal: the worker's account is signed in with the real provider CLI, and the resulting credential is captured straight into the vault you bound in step 4, in a vault item of its own. Each completed sign-in adds a new, distinct account to that tool's pool rather than replacing the last one, so a worker can hold several accounts per tool and fail over between them. You complete the provider's own sign-in, and nothing about the credential is ever shown as text in the browser or sent to an application. An API key is available as an alternative for tools that support it; Backbuild encrypts the key before storing it, outside the zero-knowledge vault. The dialog also lists Connected desktop app and Connected IDE extension; they stay unavailable unless a connected Backbuild desktop app or IDE extension offers this sign-in. The same flow is used for every tool.
Do multiple linked accounts multiply the cost? No. Pooling accounts adds rate-limit headroom, not a multiplied bill: in Failover only one account works at a time, and in Parallel each account works only up to the slot cap you set. You use the accounts you link, and the per-account slot cap is your lever on how much runs at once.
An account says Sign-in expired. What do I do? Link it again. A revoked sign-in does not recover by waiting the way a usage limit does; once you re-link it, the account returns to the pool, and a running worker picks it up without restarting its container.
Step 6: Autonomy and Automatic Workload
After this step you will be able to record, per capability, what the worker may do on its own, and choose which help desk work it picks up automatically. This is the step that answers the question everyone asks first: will it act on its own?
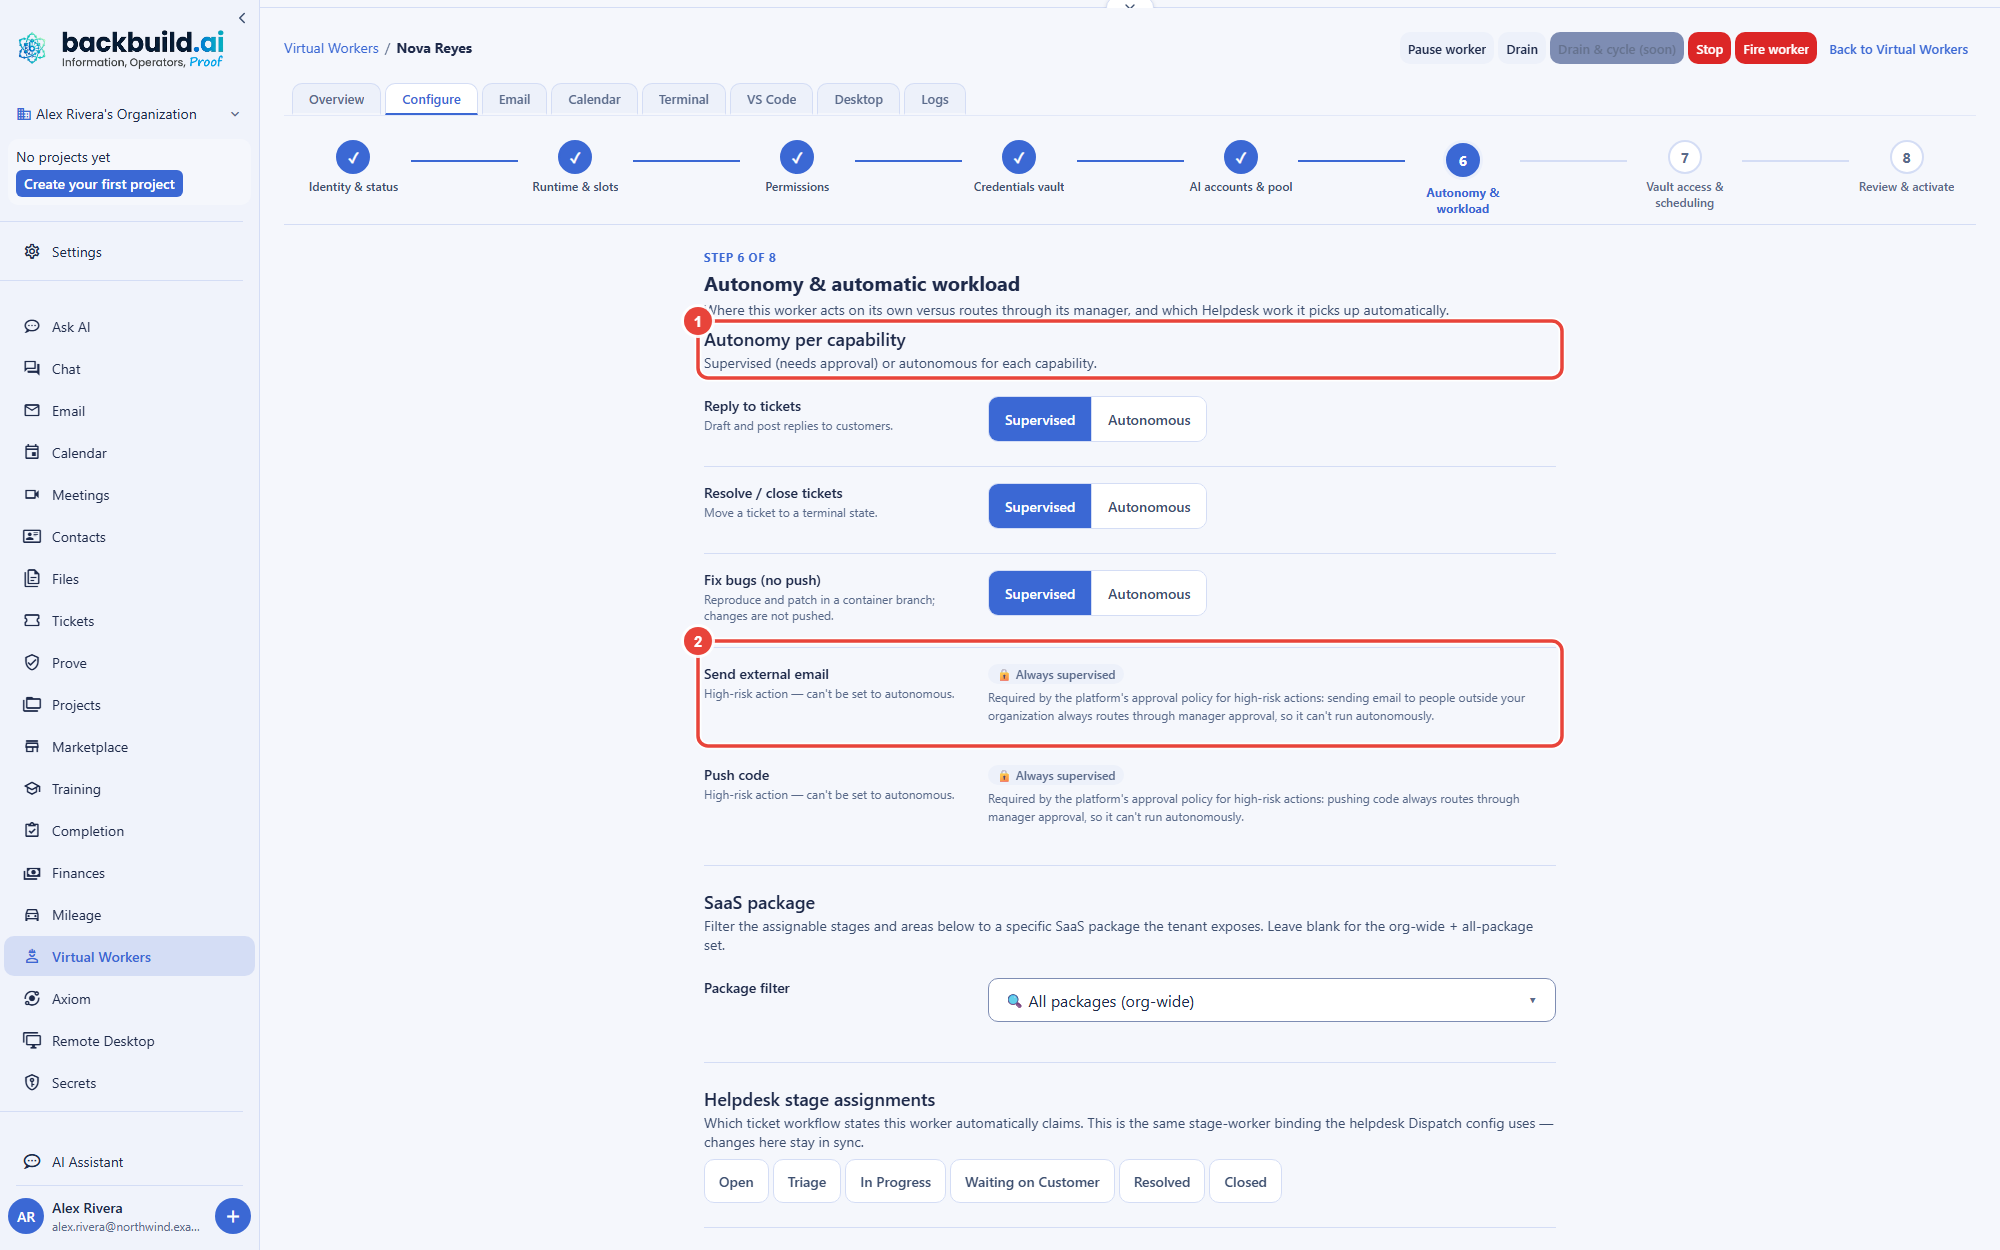
- Autonomy per capability. For each capability, record Supervised or Autonomous. Set reply-to-tickets, resolve-tickets, and fix-bugs independently, so your intent for each is explicit. What the platform enforces whatever these settings say, and the one limit for container workers, are set out in Autonomy and Approvals.
- The always-supervised floor. Two high-risk actions, sending external email and pushing code, are locked to Always supervised. The server stores them as supervised whatever a request asks for, so no setting can make them autonomous.
- Automatic workload. Choose which help desk workflow stages the worker automatically claims, and narrow it with a minimum priority and specific product areas. This is the same stage-worker binding the help desk uses, so the worker only claims help desk work automatically in the lanes you scope it to, and a filtered SaaS package keeps the stage and area lists to what that package exposes.
The recommended way to adopt a worker is to start it fully supervised, watch its drafts, and loosen autonomy one capability at a time only on the queues where it has earned your trust. Exactly which protections the platform enforces, and the one limit to know for container workers, are set out in Autonomy and Approvals.
Will it push code or email a customer on its own? Sending external email and pushing code are locked to Always supervised and cannot be set to autonomous, and its help desk runs come back as drafts. Read Autonomy and Approvals for the one limit that applies to container workers.
Will it grab tickets it should not? It only auto-claims the stages, priorities, and product areas you scope it to in this step. Anything outside that scope stays with your people unless an automation rule you set up hands it to the worker.
Step 7: Vault Access and Scheduling
After this step you will be able to grant the worker any additional read vaults it needs and set its working hours. This step combines two things: extra vaults the worker may read for its tasks, and the shift and holidays that keep it to human-style hours.
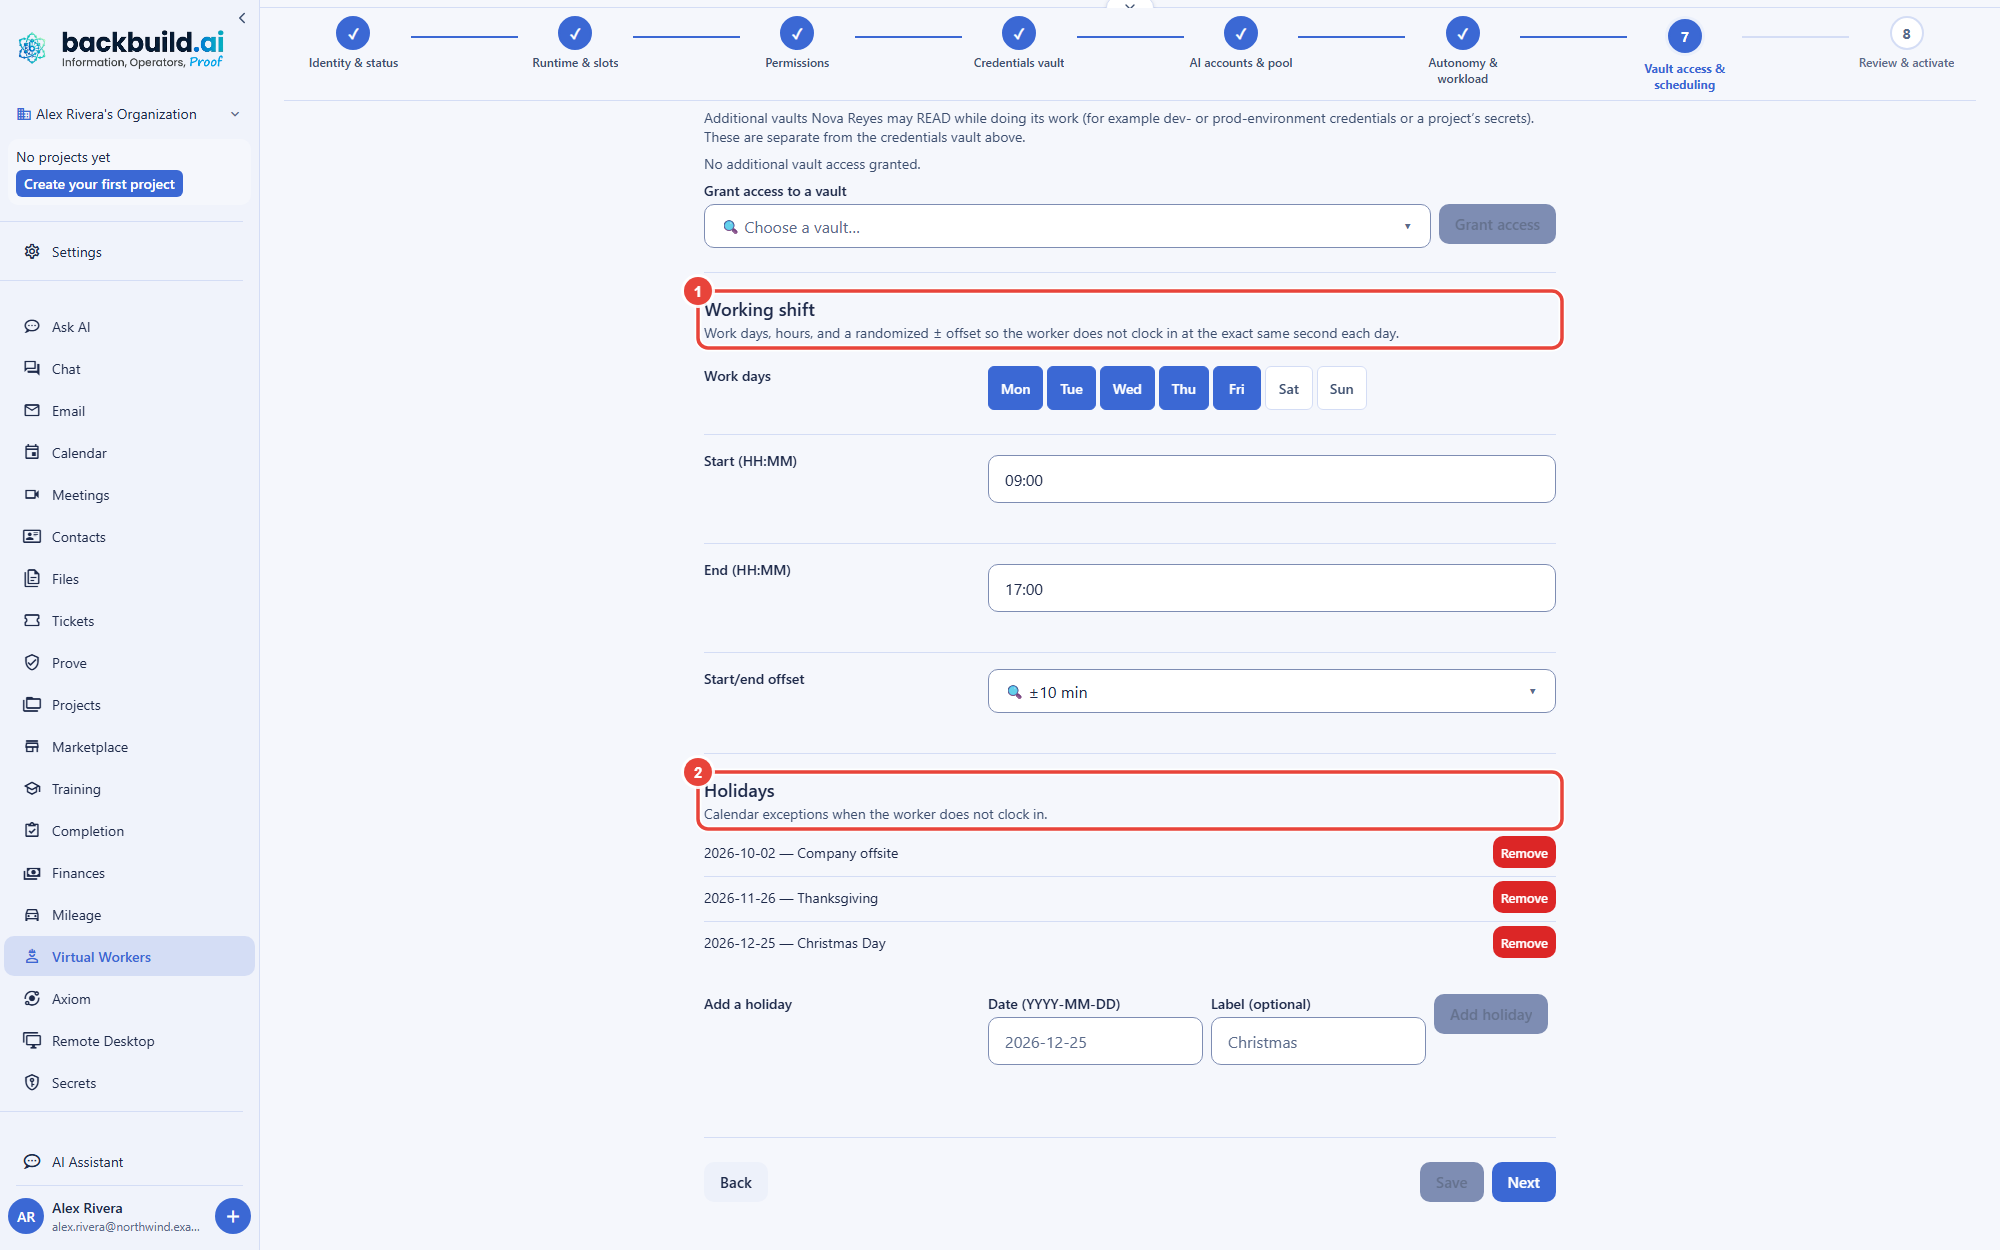
- Additional vault access. Vaults the worker may read for its tasks, separate from the credentials vault in step 4. Granting a sensitive or production vault widens what the worker can reach, so it is a high-privilege choice; grant only what a task needs. A grant to a production vault steps up with any configured second factor.
- Working shift. The days and hours the worker is on shift, read in its timezone, plus an optional randomized offset (exact, or plus or minus 5, 10, or 15 minutes) so it does not clock in at the same second every day. The fields open on the worker's saved shift, and saving changes only the fields you edited; a worker with no shift yet starts from the standard Monday to Friday, 09:00 to 17:00 pattern with a plus or minus 10 minute offset. If the saved shift cannot be loaded, the step says so, the fields show the standard pattern, and a shift change is not saved until you reload the page.
- Holidays. Specific dates, each with an optional label, when the worker is off for the whole day. Holidays are added and removed one at a time and take effect at once.
Scheduling is also a cost lever: when a worker's shift ends, its idle container is closed after a short grace period, so a worker with nights and weekends switched off draws no container credits then, and simply takes up queued work when its next shift begins. A container you start yourself from the worker's page stays up until you stop it, and a chat run as the worker, in Chat or Ask AI, can start its container off shift too.
Step 8: Review and Activate
After this step you will be able to confirm every choice and put the worker to work. The final step lays out everything you set, identity, runtime, permissions, vault, autonomy, stage assignments, product areas, and shift, on one screen, so you can read the whole configuration before you commit it. The shift line shows the number of work days and the hours that step 7 holds.
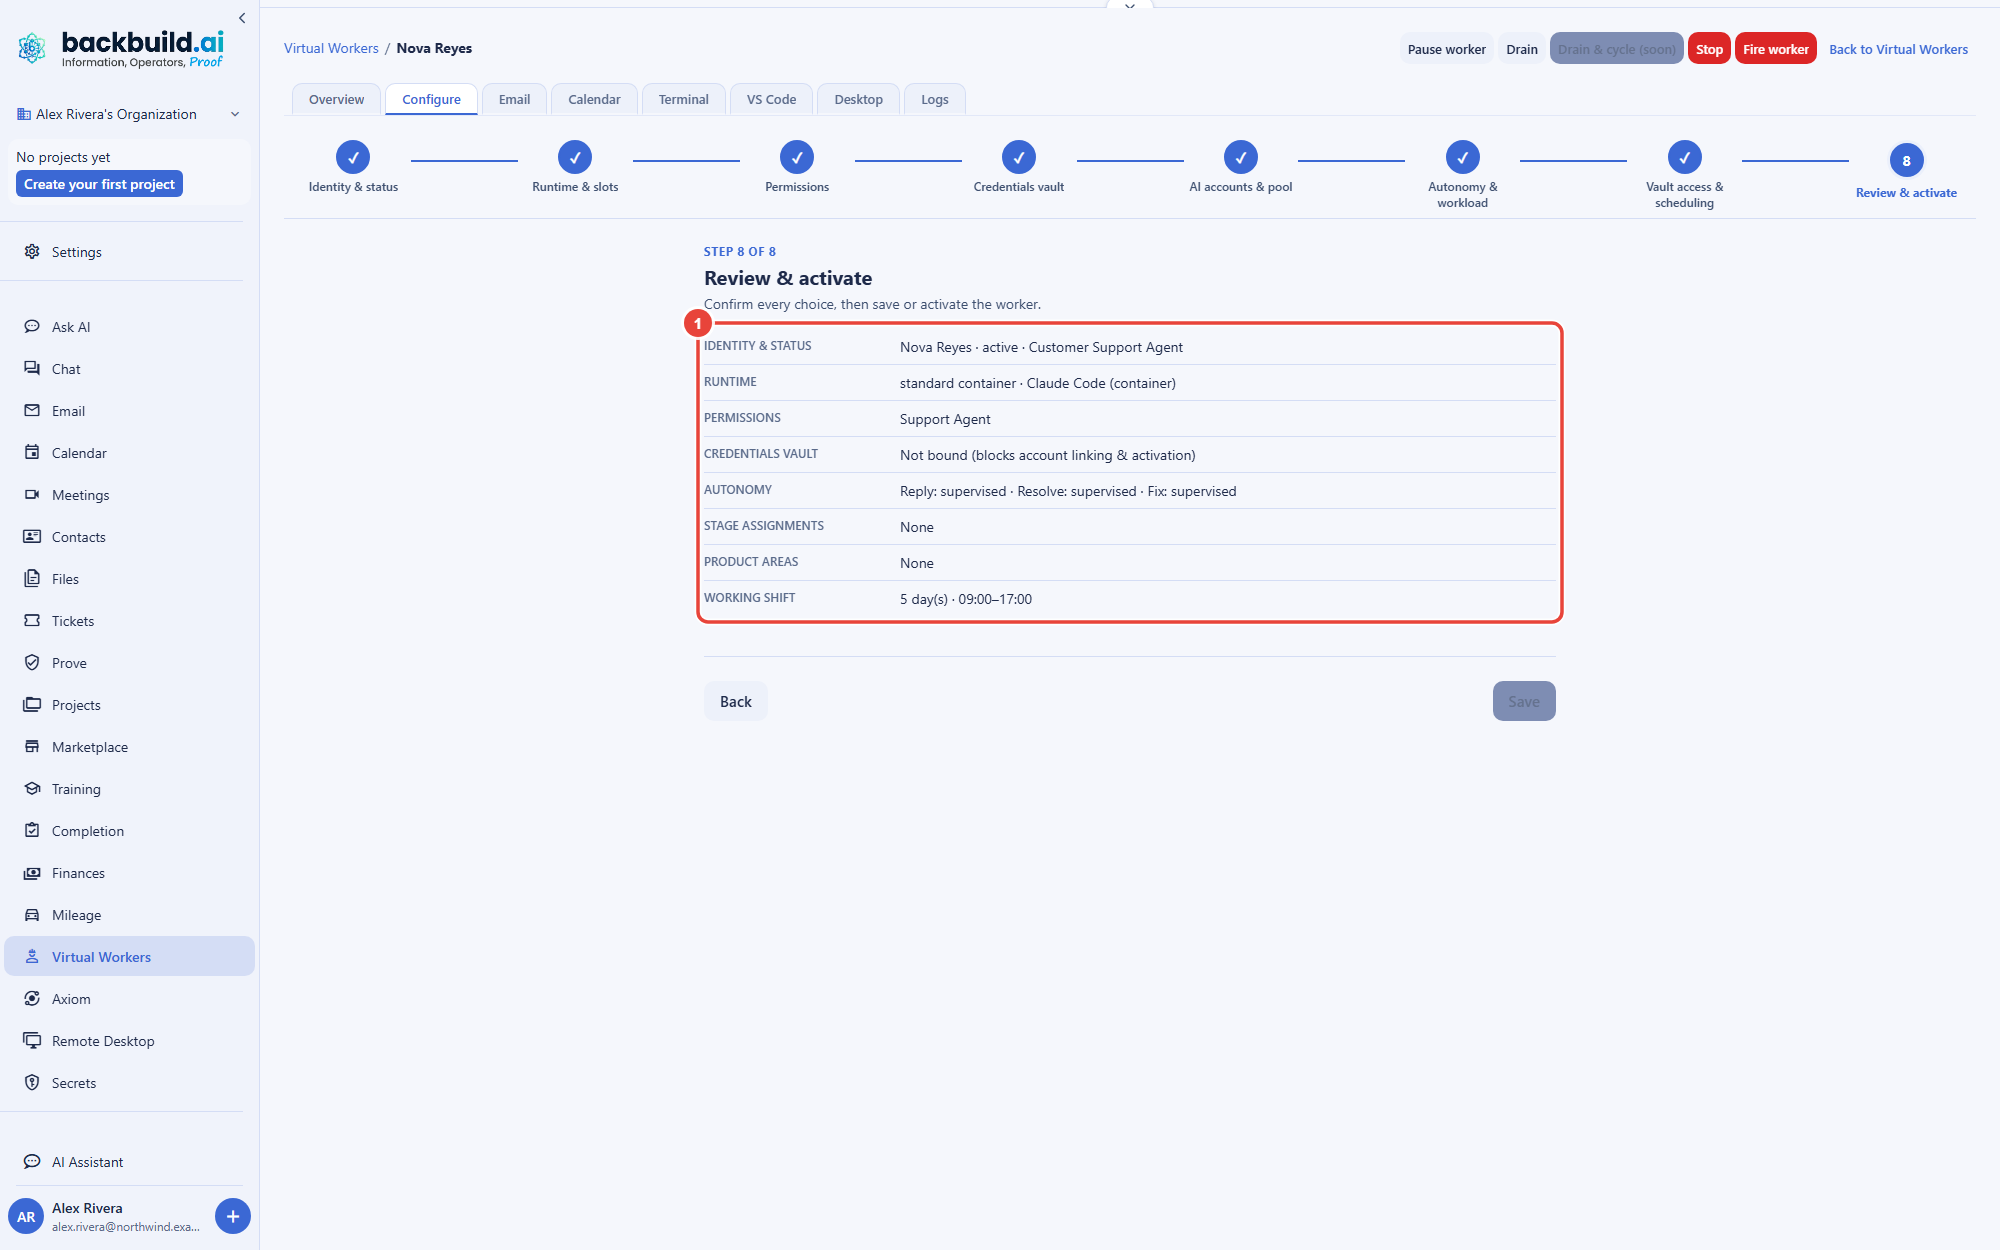
Reviewing the summary is where you confirm the worker holds exactly the reach, accounts, autonomy, and hours you intend. When it reads right, Activate worker saves everything and moves a worker that is not yet active to active; an active worker's changes are saved with Save. Nothing here is permanent: every step is editable later in the same wizard, and you can pause or fire the worker at any time without losing its configuration.
What Gets Recorded
After this section you will know that the worker's work is attributable. Everything a worker does runs under its own named identity and is written to your organization's audit trail and transcript history, so a supervisor can read exactly what it did. That, together with least-privilege permissions, the zero-knowledge vault, and the always-supervised floor, is what makes a Virtual Worker something you can put in front of an auditor. The full model is in Security and Governance.
Where to Next
- Hiring and Configuring a Worker: create the worker whose Configure tab this page walks.
- The Worker Page: the Overview, account usage meters, and the lifecycle controls.
- A Worker's Inbox and Calendar: the owner rule, the Email tab, and the Calendar tab.
- AI Connection and Budgets: the AI source model, usage throttles, and the weekly token target.
- Autonomy and Approvals: the supervised-first default, the approval queue, and the pause and fire controls.
- Security and Governance: least privilege, the zero-knowledge vault, the audit trail, and prompt-injection resistance.